The RV-6 Rebuild project
Page 5 - flight  prep and flight testing


February 
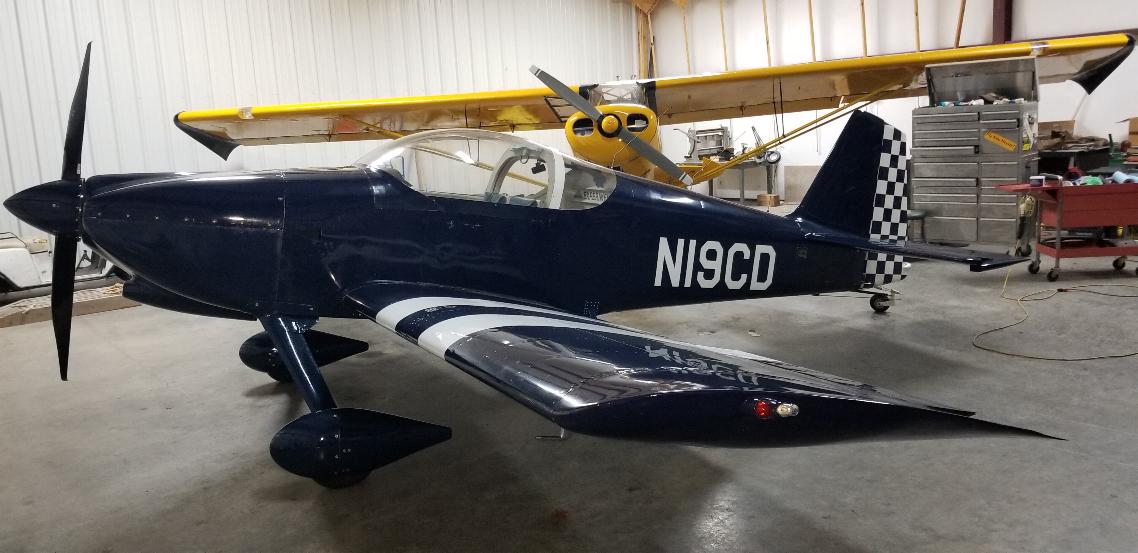
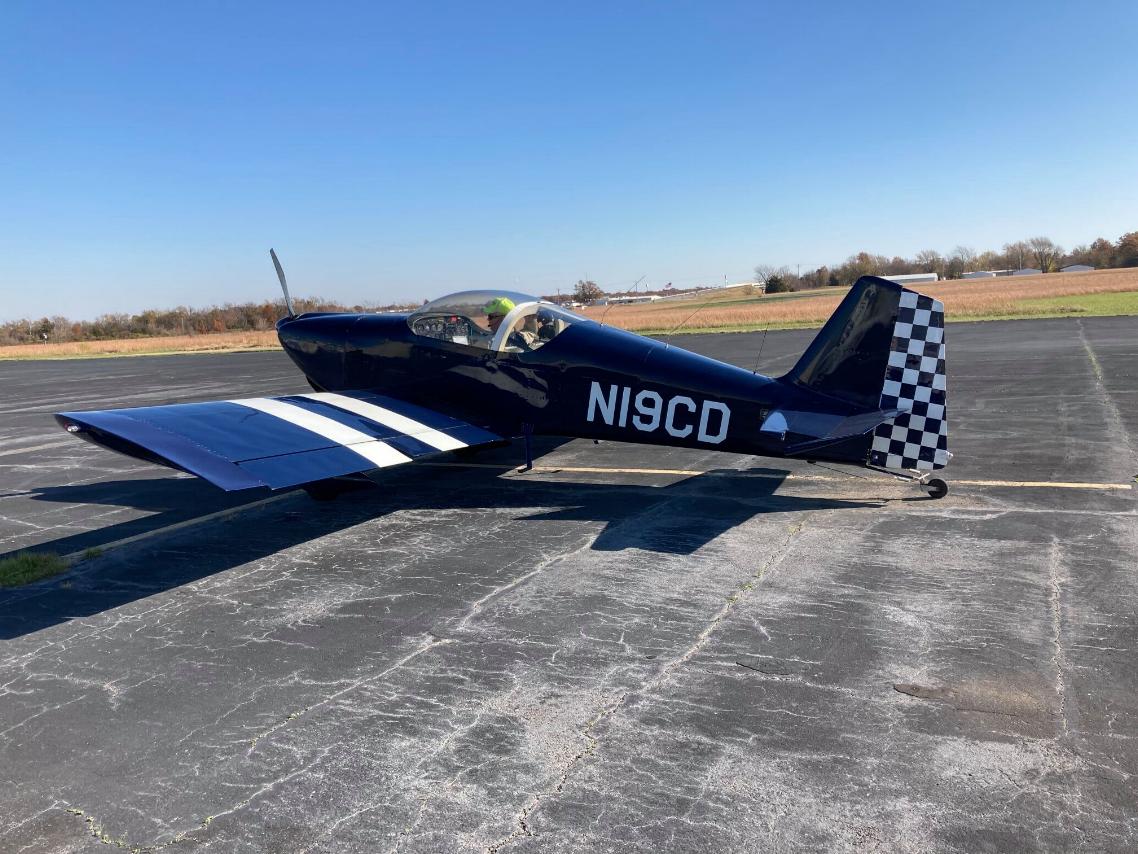
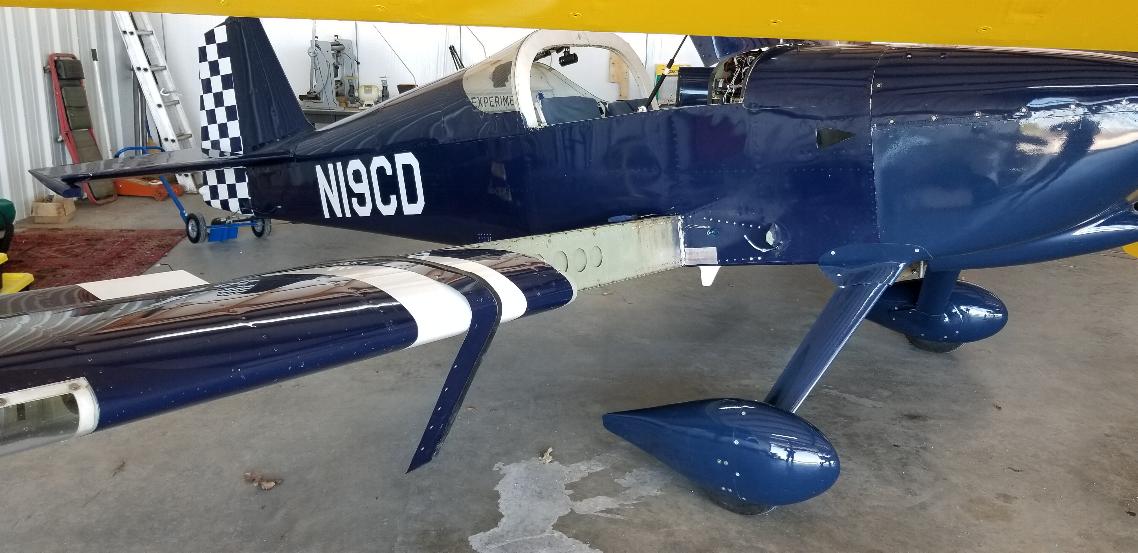
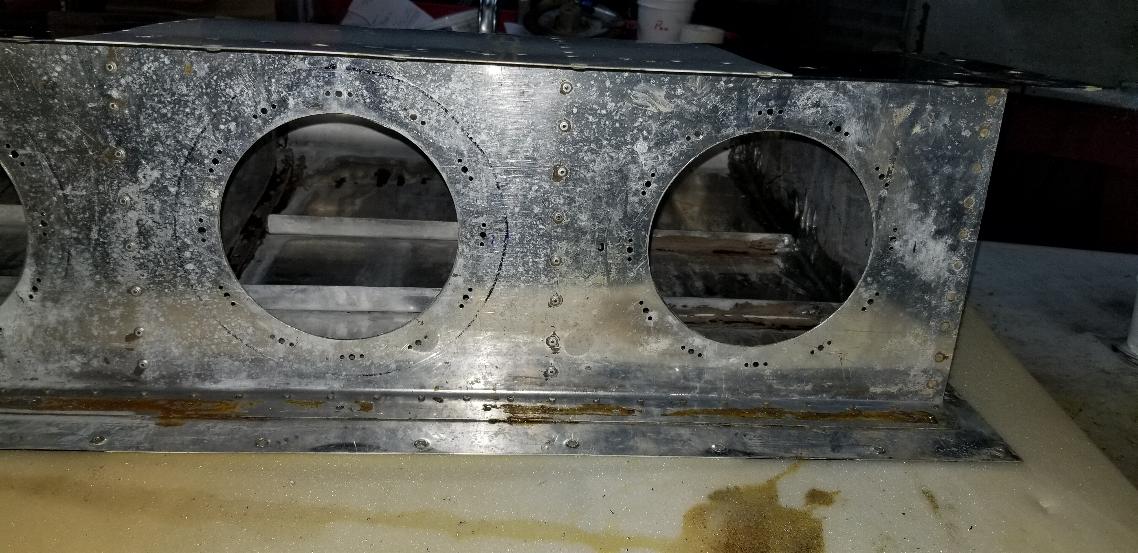
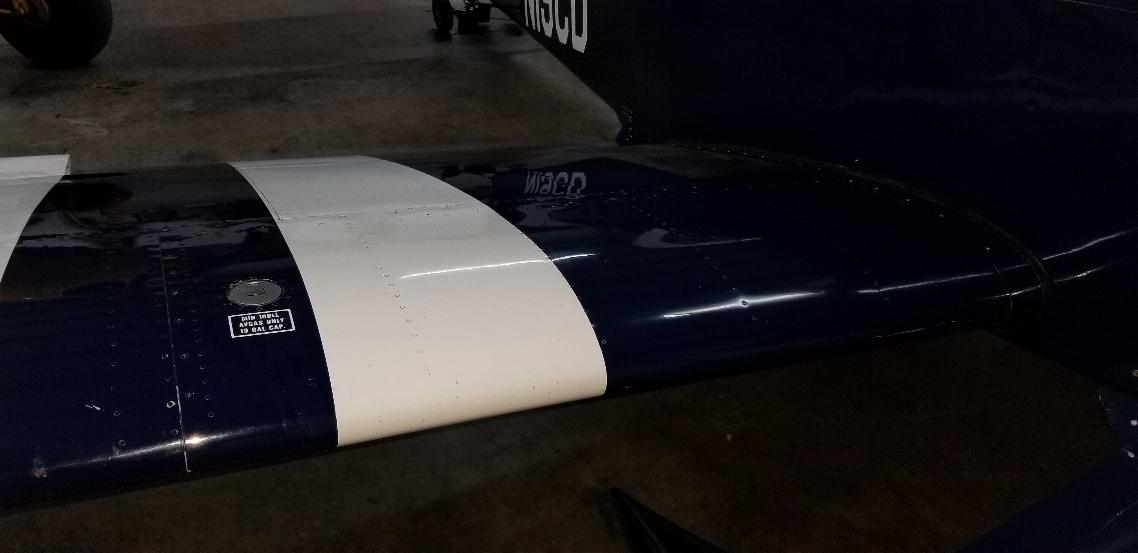
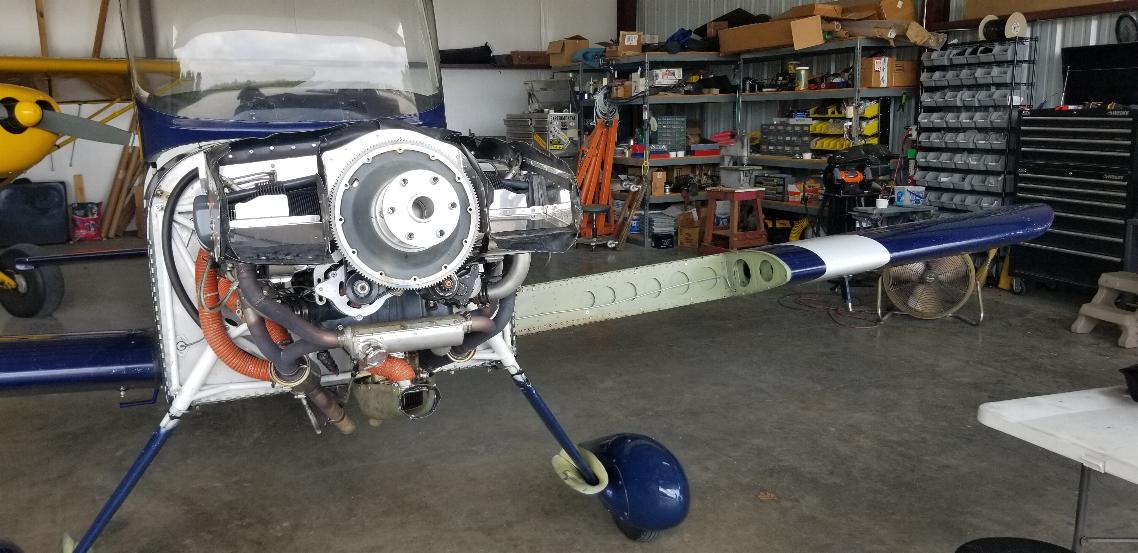
2020 - I ran across this RV-6 in Albuquerque, NM.   It has been damaged, but was priced about right, so I bought it.  Not sure if it was the right thing to do or not, but now I'm committed.  At first glance, it doesn't look too bad.  But then there are all the things I didn't know that I had to learn before I moved it.  


Return to Page 1
Return to Page 2
Return to Page 3
Return to Page 4

Note: While I am calling this flight testing, there is no flight test requirement since this aircraft has some 1200 hours already flown in this configuration.  My work was an IRAN (Inspect Repair As Necessary) and a Major Overhaul of the engine, neither of which require a Phase 1 Fly Off Period.  However, since this is a new aircraft to me, and effectively a new engine, I plan to treat it as a new plane and will do an abbreviated test period.  Additionally, since the logs for the first 1200 hours are missing, there is no record of a Test Phase 1 sign off.  So, once I have completed testing to my satisfaction, I will put a Phase 1 to Phase 2 entry in the aircraft logs with my signature.


Octobrt 15, 2020 - It finally looks like an airplane again.  The things that are supposed to pressurize, suck, blow and pump are all doing what they are supposed to do.  So, now it's cowled up and ready for some ground testing, then flight testing.  The only notes from taxiing it this morning are that I was getting a high temp warning for #4 cyl due to the EGT and CHT thermomcouples being switched, and a low suction light despite the vacuum gauge showing good vacuum.  Those have been addressed, so now it should be ready for ground and then flight testing.


I did wash down the firewall and engine with solvent and scrubbed the belly.  Then I taxied it over to the maintenance hangar and washed it.  Once back in my hangar I wiped it down and detailed it.  At least we'll start out with it looking pretty.

OK, the plane appears to be done and ready to fly.  So, let's see how ready it actually is and what happens.  I'll document my early testing.  Many things have not gone as expected with rebuilding the plane and engine, so there's no reason to believe this trend won't continue.  So, I might as well document it.  

Oct 15, 2020 - Well, it looks like a plane again.  And it is all back together again.  Unfortunately, the airport is closed to have the runway markings repainted.  So nothing is going to happen before Friday afternoon when the airport opens again.  But I seem to recall the previous owner muttering something about his brother in law saying the plane flew wing heavy, which wasn't the case before it was groundlooped.  I measured the incidence of the wings and they appear to be correct, and more importantly, match each other.  But the right flap keeps making a crunching noise when I retract the flaps.  Upon close examination, the flaps are rigged dissimilarly.  The right flap is retracting too far.  So, I opened up the flap actuator cover for the right side and lengthened the actuator rod, by roughly 3/4".  Now the flaps appear to match each other and the right flap no longer makes undesirable noises when retracting.

October 16, 2020 - Friday.  The runway painting project is still not finished.  The airport will open on Saturday afternoon.

October 17, 2020 - Saturday.  The fall winds are blowing.  No point in getting the plane out today.  But at least they did finish the runway painting project, so the airport is open.

October 18, 2020 - Gray, heavy skies with low ceilings.  I would have no qualms about flying today, but this is a first flight in this plane with a freshly overhauled engine.  I want to climb to some altitude and run this engine hard while staying over top of the airport, and I want to have time to perform some slow flight and perhaps approach stalls at altitude before I land.  So today is not the day for a first flight.  But it is a good day to do some taxi testing.  

My first impression fromt taxi testing; The engine has good throttle response and loads of power even though it is only an O-320.  It's clearly going to get off the ground quite quickly.  In fact, after I lifted the tail, when I set it back down, it did leap into the air, so I did do a few crow hops with it.  But I also had something really bad happening back in the tail that didn't feel right, was really noisy, and was quite distracting.


Obviously, the tailwheel tire is dragging against the tailwheel frame.  This was all new from Vans.  5 minutes ago, this was a brand new tailwheel.  And no, it was NOT dragging on the frame while rolling around in the hangar.  I consulted with a friend that has been flying a RV for years and he said he had never heard of this kind of issue with the Van's tailwheel.  Nor had I.  This tire wasn't even close to round, so I decided to take it to the grinder and try to grind off the high spot to make it round.


Why yes, that is all tailwheel rubber all around my grinder.  And yes the tire is much closer to round.  I put it back on and went out for another taxi.  


I wouldn't say it held up very well.  It still dragged enough that it effectively overheated and swelled to where it rolled itself partially off the rim.  It did shrink back down to the rim for the most part after it cooled down, but this is still not acceptable.  It was also quite clearly dragging while I was doing a fast taxi, so was making lots of noise and dragging as well as causing some odd feeling steering issues.  The plane is not ready to fly with this tailwheel.


However, I do have a bucket full of old tailwheels I have collected over the years, so I dug an old tailwheel out of my bucket and knocked the bearings out of it.  Then I punched the bearings out of the tailwheel from Vans and pressed the bearings from the Vans tailwheel into my old worn tailwheel.  Those bearings were also bone dry, so I pumped some grease through them, which is why the tailwheel is nice and shiny now (and the rudder skin is also well lubricated with grease now) following a high speed taxi.   But the worn tailwheel seems to have sufficient clearance that all is working fine.  

I suppose I could call Vans and gripe at them about the tailwheel and they would probably replace it, but the fact of the matter is that the wheel is something they buy and pass on at cost, and I have something that works now that will probably outlast me, so I don't think I really care a whole lot.  I also have at least one more spare tailwheel tire and rim in my bucket full of tailwheels and can order these new for $44 (from API) and $6.00 (from vans) for a pair of bearings or buy the much improved replacement tire with bearings from Vans for $105 (or $133 from AC Spruce).

I crow hopped the plane a few times.
 The landing gear on the RV-6 feels really spongy to me.  It's not a problem.  It just feels different so will take some adapting of my expectations for ground handling.  You might also notice that I added a link to the steering chains after the springs.  That was to loosen up the tailwheel steering to make it a bit less twitchy.  It seems much better, although I am contemplating adding another link.  I admit that I really prefer for the tailwheel to not do much for the steering other than just a nudge.  That makes the plane require some brakes for handing at slow speeds, but improves the handling quality at higher speeds by making it less twitchy.  I went through this with my KR as well and while training the new owner in the KR before he flew it home.  I also noted the chattering of the trailing type spring steel gear as is often times observed on the RV-6 and RV-4.  Again, it's just something to get used to, although I see a number of people adding wood braces or carbon fiber wraps to the gear to stop the chatter.  But I've never heard of this causing any serious issues with the gear, so at the point in time, I don't have any plans to do anything about it.

I also found that my new Ray Allen LED trim indicators are not working correctly.  That issue was traced to the cockpit lighting dimmer, which is hooked up to the trim indicators to cause them to dim at night.  Now they don't dim, but instead light up the middle LED out of the indicator LED stack rather than actually indicating the trim position.  Not very helpful.  I do have them working correctly again now, but they are no longer dimming when I turn on the cockpit lighting.  I'll save that problem for another day.  This issue seemed to clear up on it's own as I exercised the dimmer.

The weather is looking sketchy for the next few days, so my expectation is to get in my first flight probably on Wednesday, Oct 21.


October 21, 2020 - Now this is the view I've been wanting to see.  The first flight was mostly uneventful, but I do have a few squawks that need some attention.  I had speeds planned for lifting the tail and rotating to climb.  The plane simply lifted off before I was ready to even lift the tail.  Very short take off run despite my very gentle use of the throttle.  Once again I am reminded, you can't trust any instruments on your first flight until you prove them out.  First up is the airspeed indicator.  It is way out of whack.  There is either a leak in the pitot system or the instrument is bad.  Not sure which just yet.  I had verified that the ASI came to life when I crow hopped it.  I flew this plane at speeds up to 180 kts, but the Airspeed Indicator never made it's way over 120 kts.  Doesn't matter for landing.  I did some slow flight and established the numbers I needed for this flight and used them during approach.  I was expecting the plane to get into ground effect and float like my KR did.  Not with 40° down on those big flaps.  It just hit the ground and it was all over.  

Ailerons are very light and feel a bit twitchy to me.  But then I've been flying the SuperCub, which has extended wings and very heavy ailerons, and the KR, which is known for being very extremely light on the elevators, but has relatively heavy ailerons.  No doubt I'll adapt to these.  I did note that the right wing got heavy requiring additional trim when I deployed the flaps.  I changed the flap rigging once on the ground which cured that issue for the second flight, but the plane seems to require differing amounts of aileron trim depending on the speed.  I need to sort this out just a bit more.

Performance wise, Climb out was at 1500 fpm and normal cruise at 2550 RPM @4000' seems to be roughly 155 - 160 kts.  CHTs never went over 375° during climb, and settled in at 320° for  cruise.  The oil temp climbed to 178° and stayed there.  Balancing the engine really paid off.  It is super smooth.

Other squawks.  The left brake started leaking fluid at the slave cylinder and overall, the brakes don't seem to have much stopping power.  I'll replace the linings, and maybe the discs as they were not in the best of condition.  Tomorrow I'll replace the left slave cyl O-ring.
#1 radio side tone isn't working very well.  I need to find the manual for it and adjust.
The DG needs overhauled or replaced.  It seems to work OK for a minute or two, then when you make a turn, it tumbles.
I need to replace the cabin heat cable.  It was stiff before.  I worked on it some, but it is still stiff and not working very well.


Note the ASI is reading about 118 kts while the GPS says 182 kts.  The pitot system or the ASI is going to need some attention.  
In-Flight Video:


October 22, 2020 - Squawk repair.  The left brake turned out to not be leaking.  The fluid on the floor had come from my truck, which had a hose on the power steering give up yesteday.  Power steering fluid and 5606 Hydraulic look and smell the same on the hangar floor.  Later update.  Yes, the power steering was leaking all over from my truck thanks to a failure of the high pressure hose.  But the left brake was also leaking.  The brakes get rebuild further down the page.

I pulled radio #1 out and tweeked the side tone pot.  That fixed the side tone on the radio.  I may need to turn it down just a tad now, but otherwise is good.

I didn't find any place crying out as a leak in the pitot system.  I had a spare Airspeed indicator in the hangar, so even though it's only a 2-1/2" instrument, I stuck it in there for testing.  Unfortunately, it's a bit breezy, so I haven't flight tested it yet.  The weather is supposed to be stormy for the next several days, so I'm hoping I get a chance to flight test it yet today so I'll know whether to order a new indicator or not... or fabrticate a flange to permanently mount this instrument.  

Later in the day...  I test flew the small ASI and saw no difference.  It was also reading very low, so I switched back to the original ASI.  I replaced the pitot lines in the cockpit and test flew it again to no avail.  The next step will be to replace the pitot tube and the pitot line in the left wing.  If that isn't the problem, then the only thing left will be the static port.  I now have 5 flights on the plane including with some significant crosswind.  It's an easy plane to land and hardly seems to notice the crosswinds.  I can fly it with the ASI way out of callibration, but would really like to get this issue figured out and addressed.


October 23, 2020 - Here was the smoking gun with the low air speed indication.  This AN fitting under the left wing attach fairing was only finger tight.  Any AN nipple that is only finger tight is going to leak like crazy as the flair will not be seated on the 37° nipple.  Unfortunately, the cold front predicted for today came rolling in while I was fixing this, so I haven't had a chance to flight test it.  Why was this loose?  Guess I'll have to talk to the guy that put the wings on about that.  Seems to me it was the same guy that made a couple of assembly errors on the engine on the previous pages.


October 24, 2020 - I worked on the cabin heat control valve both yesterday and today.  Perhaps I was motivated by the cold front that swept in yesterday.  The cable going to the heat control valve had been installed with numerous U turns in it, apparently in an attempt to keep the cable snaking along the right side of the cabin.  That also caused a lot of binding in the cable.  I got rid of the U turns and straightened the cable out, then trimmed the length of the cable accordingly, so now the cabin heat valve worked, but the valve itself seems to bind up so it wouldn't shut off completely once I have pulled the cable to turn it on.  My buddy George in Phoenix (an old hand with many decades of experience) suggested I add a spring to the heat control valve to assist the bowden cable in shutting off the heat valve.  With a ratcheting cable which locks in place when I pull it, the spring to assist it in closing the valve worked like a charm.  (Thanks George!)  The spring is hidden underneath the black spiral wrap in the photo above.  And the heat exchanger on the right side muffler works great!  It puts out real heat, so now I have two planes that both have good heaters.

Much Later Note.  I eventually replaced this sticky cabin heat valve with one that has the cable on the inside of the cabin rather than outside.  It works great!

Additionally, I ordered a used DG to replace the failing one in the plane.  The used unit was $175 with a 30 day return.  An overhaul for my current unit is $350.  With so many people upgrading to electronics, the market is flooded with serviceable used gyros, so I'll take my chances with a used one in the short term.   That should address all the current squawks on the plane.  I'll do one more test flight to confirm all is well, which will make 5 hours since putting the plane back together again, then will enter a phase 1 to phase 2 endorsement in the logs since the original logs with the 40 hr phase 2 endorsement are missing.  

So far, in the first 4 hours of flight, it appears the engine has used just under a pint of oil and there are no visible leaks or drips.  I only get a few post flight drips out of the breather tube.  Otherwise, the engine compartment is bone dry... so far.

October 29, 2020 - It's been a week of low ceilings and rain.  I did receive the replacement DG yesterday, so installed it today.  I forgot to ake photos, but wasn't anything special.  Just remove the old and install the new.  Most of the work is done through the avionics access hatch on the top of the front deck.  I also noted that I do indeed have a hydraulic weep in the left brake and am losing some hydraulic fluid.  Today's parts shipment included new discs and new pads, so sometime in the next week I will take off the wheel fairings, pull the wheels and replace the brake discs, pads, and O-rings.  I'll also repack the wheel bearings while I have everything apart, reassemble, and charge with new 5606 hydraulic fluid.  The brakes will all be effectively new when I'm done.  


Oct 30, 2020 - Uh oh.  This doesn't look good.  The rains have finally cleared and the weather is gorgeous.  I got the RV out this morning and could only taxi in circles as the left brake was dead.  No hydraulic fluid.  I had been unhappy with the brakes and had planned to rebuild them anyway.  Yesterday's parts delivery included new brake linings and new discs.  I also took the slave cylinders apart and lightly sanded the  sealing surface with some emory cloth and replaced the O-rings before reinstalling and bleeding.  Now it has brakes that really work.


New Rapco discs and the old worn out discs.  The disc on the right is the one from the left brake.  The surface isn't even close to flat, so there was very little surface for the brake pads to clamp on to, which is why the left brake was so bad.  The right brake was better than the left, but neither was good.


Leaking slave cylinder.  These got cleaned up, honed and new linings riveted on.


Bearings and seals get repacked any time I have the wheels off.  These have NOT been washed with solvent.  That's a bad thing for the bearings unless you let them completely dry; like overnight.  I just wipe off all the grease I can get to, then pack the new grease through the bearings by hand forcing out the remnants of the old grease.  Since I changed to Lubriplate grease, I make it a point to force as much of the old grease out as possible.  The bearings and races were in good condition, and there was nothing wrong with the old grease.  But I have used Lubripate for many decades in planes, cars and trailers (and while working as a fleet mechanic), and have never had a bearing problem.


I also found the primer all the way to the right of the throttle quadrant was leaking any time I turned on the electric pump (which pressurises the gascolator and primer at ~5 psi).  I found the O-rings in the primer were rotten and cracked.  It got new O-rings with a coating of EZ-turn to help the O-rings seal.

Fixing the leaky Pitot line in the wing fixed the low air speed indication issue, so now I have an accurate air speed indication.  I have completed my Phase 1 testing and noted phase 1 complete and aircraft now in phase 2 in the aircraft logs.  I do still have another couple of squawks to fix.  I exercised the VORs today.  I'm not sure I understand the ESCORT 2 VOR.  The Mark 12D VOR Seemed to work OK, although seemed to be a bit overly sensitive.  The DME on it also worked (the DME antenna was missing and the cable antenna coax was in quesntion when I picked this up).  I also exercised the autopilot a bit.  There is a lot to learn there.  It would just continuously rock the ailerons back and forth, but I didn't have anything with a heading for it to slave to other than the VOR, and I need to read up on how to properly engage it to the #1 VOR.  The RV does have very light ailerons, so I would guess the gain needs to be adjusted a bit.  But I am assuming this was working at some point in time, so first I want to get it talking to the GPS and see what it does when it tries to hold a course before I start making adjustments.

Today's Video
October 31, 2020 - I put some cross country time on the RV today with a brunch flight to Houston County Airport over on Kentucky Lake in Tennessee, then a stop in Humboldt, TN to visit with some friends there before flying back home.  The video above is crossing the Mississippi from TN int MO on my way back to AR.  I'm really pleased with the overall performance of the plane.  Good climb, good speed, and reasonably economical.  At 7 hour flight time, the engine has used just under a qt of oil and has no drips other a couple of post flight drops out of the breather tube.  Yes, that is a stop drilled and glued crack in the canopy where the video stops.  The canopy has stop drilled and glued cracks on both sides, but they seem to be solid, so I won't worry about them for now.  A new canopy is $1400 plus shipping.


November 7, 2020 - On the ramp at Lamar, MO.  I've got over 15 hour son the plane now and am liking it a lot better all the time.  However, as I fly it more, I am also finding more issues.  So, the squawk list as it exists now is:
1. Right fuel tank leaks when full.  By the streaks on the top of the wing, it is leaking at rivet line at the back top of the tank.
2. The gascolator leaks fuel when under pressure (electric pump on).
3. The cheapo intercom I bought just to prove out that the radio works really sucks.  I'll buy a Sigtronics SPA-400 and wire it in.
4. The STEC 20 autopilot and Porcine GPS to Autopilot converter are not talking.  All indications are that it is a wiring issue, so I'll be looking into that.
5. The linkage on the elevator trim has a bit of slack in it that I'm not happy with.  I'll need to find a way to bush the pin that goes through the arm on the trim tab as that's where it is sloppy.
6. The flap rigging just isn't quite right.  Also the linkage, probably the torque tube, from the right flap to the linear actuator doesn't feel right.  I need to dig into that to do some exploring.

Otherwise, I am thoroughly impressed with the plane and am quickly going to the dark side and becoming a RV disciple.  


November 13, 2020 - Yes, those are fuel streaks on the top of the wing from the leaking right fuel tank.  It appears to be leaking at the top seam.  Not a task I'm looking forward to fixing, but will jump in with both feet soon.


November 15, 2020 - Dang.  I'm back under the seat pans again.  This was to get to the PTT wires from the control sticks to wire in the new intercom.  In the photo below you'll see the new intercom on top of the breaker panel.  The headset plugs are now along the cockpit edge just above the air vents.  The intercom is in and works correctly.  We'll test it in a noisy environment (flying) sometime this week.


I started diagnosing the GPS > Porcine > Autopilot problem.  The Porcine device takes the NMEA output from the seial port of the GPS and converts it to left/right steering commands for the GPS.  You install a double row double throw switch in line with the steering command line from the VOR to the Autopilot, and the Porcine device gives the autopilot the same steering commands using the GPS output as the VOR would if I was flying an inbound radial.  I had no indication that anything worked, including the power up self test where the Porcine device is supposed to flash the GPS OK light as part of it's self test.  In the photo here, I have the test leads across the incandescent GPS OK light.  And yes, it is burned out.  I ordered a new LED indicator for the panel.  But I should be able to do do more in the way of diagnostics this week with the DVM across the GPS OK leads so I know when it is on.  The Porcine device is the white box hanging out of the front of the panel to the right of the throttle.  It is normally mounted behind the panel with a RAM ball on the front of the panel where the GPS mounts.

November 16, 2020 - I left the leads across the GPS OK light as shown above and hooked up the GPS.  Sure enough I was getting a GPS OK once I turned on the NMEA output on the GPS and the GPS had acquired sufficient satellite coverage.  I plugged in a course on the GPS and the stick slowly rolled off in the direction of the course.  So, I took it out to fly and sure enough, the Autopilot will fly a GPS course now.  It does a lousy job of intercepting the course or pre-turning towards the intercept, but once on course, it stays on course.  That's good enough for me.  It does like to do little 5° or less dutch rolls, but otherwise seems to work pretty well.

I also rerigged the flaps (but forgot to take pictures).  They seem to function better, but I can't say that I think I'm done fooling with them.  I thought the plane seemed slow afterwards, but it was pretty windy today and I was busy playing with the GPS and Autopilot, so wasn't paying a lot of attention.  I did burn enough fuel out of the right tank this afternoon that I think I can drain the rest of the tank into a 5 gallon can and remove it for repairs.

The new intercom works pretty well, but the sound from the radios and the overall sound level of the intercom seems pretty muted.  
Continuing on with the intercom, I changed the resistors from 300 ohms to 240 ohms.  I'm not sure it was much of an improvement.  I'll have to fly it again to know for sure.  


November 17, 2020 - The right fuel tank has been removed for repairs.  It was leaking substantially at the top rear seam when the tank was full.  
2022 - I'm getting seeps at the top seam of the tank again.  This seems to be an issue with the aluminum skin getting hot when out in the sun and expands enough to break the seal between the top skin and the back of the tank.  Having the plane painted Navy Blue sure doesn't help with this problem.  Since it's only the top seam, it will be a simple job to just pull the tank off, clean and slosh the top seam.  But the nasty brown goop I clean out of this tank below is still in the left tank, and it is now starting to seep, so it will get the same treatment as the right tank below.


I placed the tank on it's back on top of some blue towels and splashed just a tiny bit of gas into the tank.  The leaks are evident.  This happened in a matter of just a few seconds.  One more seep appeared at the next bay to the right later.


So, I took a 5" hole saw to the back bulkhead.


Then I cut out some larger circles to cover them once the internal repair work is completed.  I am waiting for the 3M Aerospace AC-770 Sealant to arrive later this week.  I also ordered some #6 nut plates to rivet in to attach these bulkhead access holes.  Little did I know at this point in time, all that brownish colored slosh compound inside the tank would have to be cleaned out.  What a nasty job that turned out to be.


November 18, 2020 - Laying out the holes in the covers for the access holes in the tanks.


Access panels Clecoed on.  Each of these holes will get a nut plate riveted on with countersunk 3/32" rivets and a #6 screw to hold the panel.  The panels will also be put on with a generous amount of 3M Aerospace AC-770 sealer.  


November 19, 2020 - Now this looks ugly.  Apparently these tanks were sloshed with some sort of brownish/yellow compound.  It is tacky stuff, even after 26 years.  Inpreparation for sealing this tank with the 3M AC-770, I used the tank cleaner that came with the KBS slosh compound I used in the Cub tanks to clean the leaky seam.  The ugly brown compound in the tank immediately melted, and of course that migrated into the other bays.  Now I have to cut holes in the other two bays so I can clean them as well.


So now I have that I have all 5 bays open, I went inside to scrub the ugly brown stuff out of all 5 bays with the cleaner, a wire brush, and a scotch brite pad.  Not a fun task at all.


November 20, 2020 - OK.  Decision made.  I decided to use the KBS tank sealer process rather than the 3M product in the seams of this tank.  I acid etched all of the perimeter seams inside the tank, then painted them with the KBS sealer.  I have had very good experience with this sealer and am confident it will work well in this application as well.  The KBS sealer is the gray goop you see that was brushed on the seam in the photo above.  I will use the 3M AC-770 to seal the 5 access holes I cut in the back of the tank.


All 5 access holes cut open now.  I am waiting for a shipment of #6 nut plats to rivet in to hold the access covers.  I'll seal the covers with the 3M AC-770 tank sealer.


November 22, 2020 - I've got the holes drilled for the nut plates for all 5 access panels, but things came to a screeching halt.  I got out my 3/32" dimple die to countersink the rivet holes and found that my die was 1/8".  I had to order a 3/32" dimple die.  It won't be here until Wednesday, so for now, the fuel tank repair is on hold.


November 23, 2020 - I found a 3/32" dimple die to use to countersink the 120 holes for flush riveting the nut plates into the tank for the tank access panels.  I have them clecoed into 4 of the holes but don't have enough nut plates for the last hole.  More nut plates should arrive tomorrow.


November 24, 2020 - I riveted in the nut plates for the covers today.


November 25, 2020 - The sealing surfaces have been scrubbed with ScotchBrite and acid etched.  I also scrubbed and etched the back side of the cover plates.  


The cover plates are sealed on with the 
3M AC-770 tank sealer and held down with 12 #6 screws per plate.  This is chemically the same as ProSeal, sticks to everything like ProSeal and stinks to high heaven of sulfur. I had more than adequate working time to do all 5 panels from one batch.  I left a heater running on low blowing on the tank, so hopefully these will be cure reasonably quickly.  I probably won't get back to them until Friday.  If they are set then, I'll get to mount the tank back onto the plane.

November 26, 202- - It's Thanksgiving.  Much to give thanks for this year.  I bought and rebuilt the RV-6.  Awesome performing airplane, even with the "small" 160 HP engine.  And I have the equally awesome SuperCub Clone to play with as well.  Life couldn't be better.  

I checked the set of the 3M AC-770 sealer on the fuel tank.  It set up nicely overnight last night.  It has a nice rubbery set, but is no longer tacky.  I'll leak check the tank tomorrow.


November 27, 2020 - There are 2 gallons of fuel in the tank and no weeps through the back, which is where the problem was, and where the 5 new access holes are.  


The tank is re-installed back onto the plane and is now full of fuel.  No sign of any leaks or weeps yet.  I'll check again in the morning.  I also pulled the cowling and fixed the fuel leak at the gascolator.  The fuel leak turned out to be the sweated end on the primer line where the primer system gets fed from the gascolator.  Whenever I  turn on the electric fuel pump, it pressurizes the gascolator and the fitting on top of the gascolator would start leaking.  I replaced the silver soldered fitting with a compression fitting.  I also have an EGT thermocouple that is reading incorrectly and seems to be unstable.  Sure enough it is the one that had the connectors broken off. I added simple crimp on spade connectors to it, but by doing that created 4 more bimetallic junctions, which will cause all kinds of weird readings with the thermocouple.  I ordered a type K thermocouple connector to repair it next time I have the cowl off.

November 28, 2020 - I got the RV out to fly to breakfast today.  The fuel tanks were still full and no fuel smell, so I'm declaring victory for now.  I need to plan to pull the left tank at some future date and rebuild it just to get the slosh gunk out of it.  But that will wait for spring.  I replaced the burned out "GPS OK" bulb on the autopilot panel with a 24V LED, so that now works.  I finally got the new intercom and radios to play nicely together.  The installation instructions for the intercom recommended a 220Ω resistor.  I used 300Ω instead, but the radios seemed terribly attenuated.  So, I tried 240Ω with little improvement.  I dropped it to 100Ω again with a marginal improvement, then removed the resistors all together and still the radios were terribly attenuated.  Then I found the problem.  I had bumped the headset and the volume was turned down on the headset.  Duh.  


Only three minor squawks left to fix and one future project.
1.  Install a type K thermocouple connector on #2 EGT connection to fix the errant reading and stabilize the readings.
2.  Replace the trim button in the left stick as "Nose Up" trim is intermittent.
3.  Install new seat harnesses.  I bought new ones, but ordered the shoulder harnesses too short.  Extensions are on order.  
4.  At some point in the future (probably spring time) I'll rebuild the left fuel tank to get the slosh compound out of it
Otherwise, the plane is now at 100%.


December 4, 2020 - Installed 24V LED light in the Autopilot Control Panel for GPS OK.  GPS OK light indicates that the GPS is passing navigation data to the Porcine device, which talks to the STEC 20 Autopilot.  Some might notice the Oil Pressure at only 52 psi.  This is at low idle with the engine warm after landing, so all is good.  

I bought a new trim button, but found the problem with the trim button in the left stick was not the button itself, but a metal mounting collar that was added onto the trim button.  I remounted the collar and that seems to have addressed the problem of the contacts failing to make intermittently.

I have the type K thermocouple connector, then noticed that the oil temp thermocouple also has standard crimp on connectors, so will need to order another type K thermocouple connector to fix it as well.


Installed new Crow safety harnesses.  I really like these harnesses.  5 point clip that you can snap in one at a time and very comfortable.

June 26. 2021 -  After the previous issues with the right fuel tank, I was fully expecting to need to rebuild and seal the right fuel tank as well.  So, it was no surprise when it started seeping fuel a couple of weeks ago.  Today I removed the left tank with every intention of cutting holes in the back, scrubbing all the sealer out of the tank, then resealing it like I did on the left tank.  But, it seems things are never as expected.


Left fuel tank removed for repairs.  I also removed the cowl as the back of the top cowl had been billowing open a bit in flight, so I wanted to add some additional Camloc fasteners to it.  More on the cowl later.


With the exception of the fuel level transducer in the back of the tank, I couldn't find any evidence of a leak or weep in the tank.  But this was clearly leaking.  


I removed the transducer and fabricated a new gasket, cleaned and prepped, then re-installed with 3M AC-770 tank sealer (just like ProSeal).  This tank has a flop tube installed in the inboard bay, so the transducer is installed from the back into the second bay of the fuel tank.


There was some evidence that the bottom screw on this access cover might have been weeping a tiny bit, so I removed this cover and sealed with 3M AC-770 tank sealer as well.


Sealed access hatch.


 The upper cowl had been billowing up a bit in flight.  I had decided to add some Camloc fasteners between the existing fasteners, but there were just too many things in the way to accomplish that task in a reasonable way.  So, I decided to stiffen the back edge of the cowl instead.  What you see here is a slug of glass microspheres mixed with Aeropoxy resin to a peanut butter consistency then laid in a bead to act as a core material.  Then I placed 3 layups of 5.5oz BID cloth at a bias.  That should stiffen the areas and keep them from billowing under pressure in flight.  Later flight testing showed this to be an effective fix for the issue.


Return to Page 1
Return to Page 2
Return to Page 3
Return to Page 4

Comments or questions;  Email me jscott.planes@gmx.com