This is a bit of a long sad
tail about
an often mistreated Beech Skipper. I helped a friend from Los
Alamos, NM acquire this Skipper in Socorro, NM in 2002 so he could
learn to fly. He lost interest and the plane sat on the ramp
for
a few years. Along came another acquaintance that was
interested
in the Tomahawk I owned at the time. I wasn't ready to sell
my
Tomahawk yet, but turned him onto the Skipper. He bought it
and
enjoyed flying it for a while, but it got caught up in the middle of
his divorce, the wife/ex-wife threw away the logs, and he moved to
Orlando leaving the plane to deteriorate out in the sun on the ramp in
Santa Fe. In 2015, he asked me to resurrect the plane and
find
someone to fly it to Florida so he could resume flying. I
really
thought I had seen the last of it then. But this year (2021),
I
received an email stating that the local mechanic said the engine was
junk and the plane was junk, and was I interested in it for an almost
give away price. Well, not really. Not that I
didn't think
it was a bargain. It's just that I already own a SuperCub and
a
RV-6. What possible use would I have for a Skipper?
But, I
told him either I would buy it, or I would find a new owner for it.
I just can't stand to see a decent airplane get scrapped. A
relatively new acquaintance I had just met a month ago is just getting
back into aviation after 20 some years away, so I asked if he was
interested. He was, if I would help him get the plane home
and
through it's first annual. So, in order to keep the plane
from
getting scrapped, I'm involved with it again. We drove to
Kissimmee, FL and spent one day patching the plane back together with
JB weld and Gorilla Tape, then I flew it home on a ferry permit with a
few deficiencies. 8.8 hours with 2 fuel stops from Kissimmee,
FL
(KISM) to Sharp County, AR (KCVK). The engine ran perfectly
and
the plane flew nicely, but as previously stated, it had a number of
deficits and developed a few others along the way.
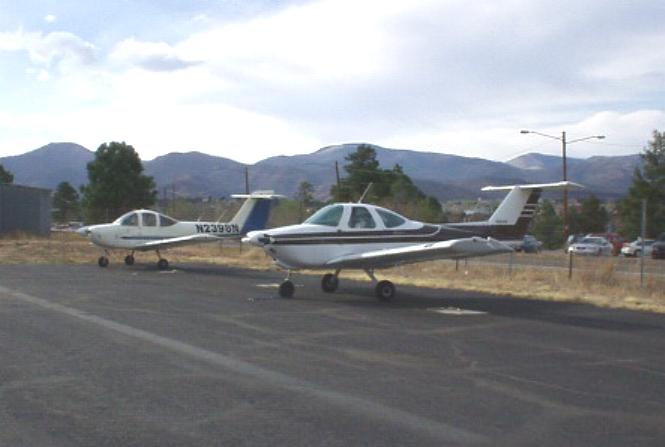
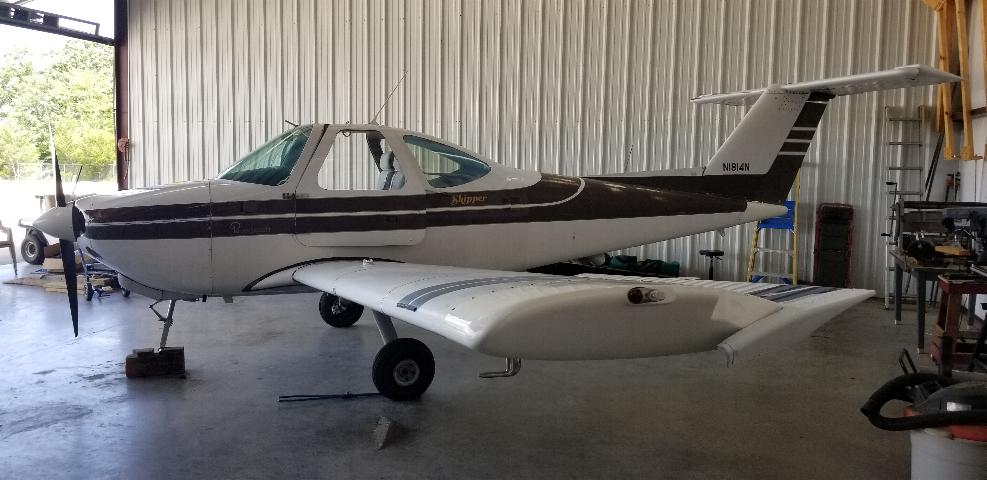
The Skipper in happier days around 2002 parked next to the Tomahawk I owned at the time.
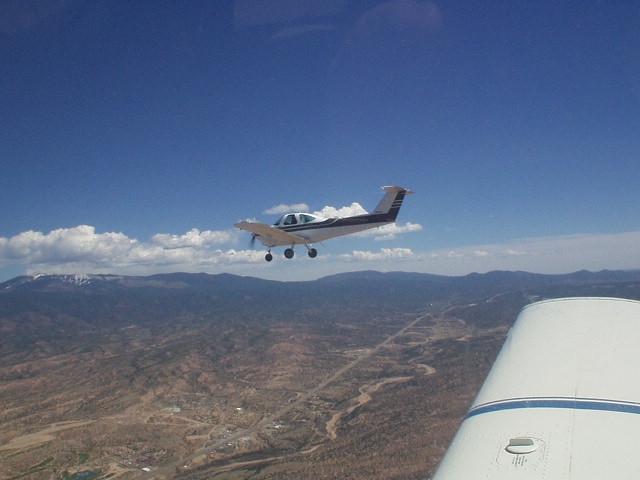
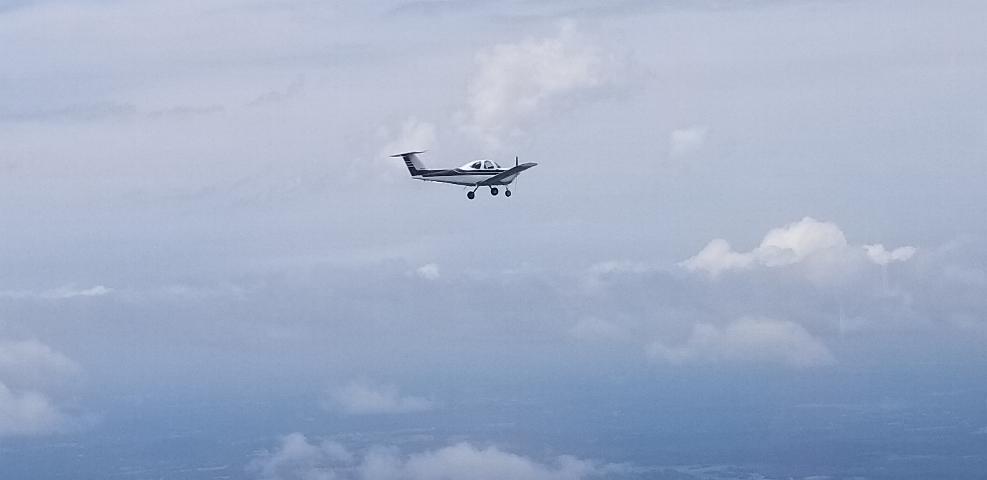
In flight near Los Alamos, NM 2002.
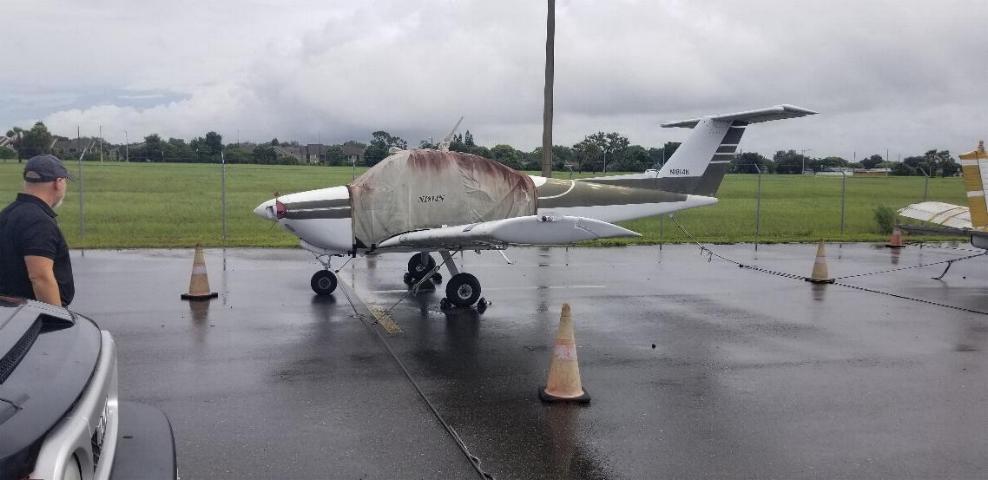
Here is the state the plane was in when we arrived in Florida in early July. This is the new owner either admiring his new purchase, or looking on in horror at what was in front of him. Yes, that is mold all over the canopy cover, and the wings, and the tail. The right door was left ajar, so the interior was soaked and mildewed. The flush mounted drain in the right wing tank was leaking fuel and couldn't be readily repaired, or removed. The engine had fouled plugs and water in the fuel tanks, but the fuel had leaked out anyway, so all that was left was some water. We splashed some gas in it and hand propped it to taxi over to a maintenance hangar where we spent the day working on it. With all the moisture inside and out, every contact was flaky. Master switch, radio switches and pots, headset plugs, you name it. It was all a bit flaky and problematic. It got a new battery and a lot of attention to small things. The leaking fuel drain simply was not repairable in the time frame we had to work with. I injected the end of the fuel drain with quick set JB weld, then taped over the drain with Gorilla tape and wrapped the tape up around the leading edge to keep it from peeling. That stopped the leak, so we fueled it up and thought we had it ready to go. The next morning, I aborted the first take off roll with no airspeed indicator. We removed the right wing tip and found the line from the pitot tube that runs through the wing was rotten and had failed up inside the wing. We used a piece of PVC pipe inserted through the wing to route a new piece of 1/4" tubing through the wing, but couldn't readily reach the fitting at the fuselage to terminate the new piece, so chose to splice the new tube to the old tube just short of the fuselage. It worked OK, so I was off again. ADS-B equipment exception was filed; Ferry permit in hand; I taxied out for take off. As I was taxiing out, I noticed that the gyro instruments fogged over on the inside. At this point in time, one should note that the Beech Skipper uses pressure rather than vacuum from the vacuum pump to run the gyros. So, the air was coming through the pump and turning into steam, which told me the vacuum pump was likely heating up due to corrosion inside the pump and would likely fail soon. It did. I noted the instrument pressure had gone to zero before I was out of sight from the runway. The gyros continued to spin for some time, which actually bodes well for their condition. Additionally, ATC said the transponder was working correctly and reporting the correct altitude. That was an unexpected bonus! So, off I went to do battle with the thunderstorms roaming across Florida around and north of the Orlando area.
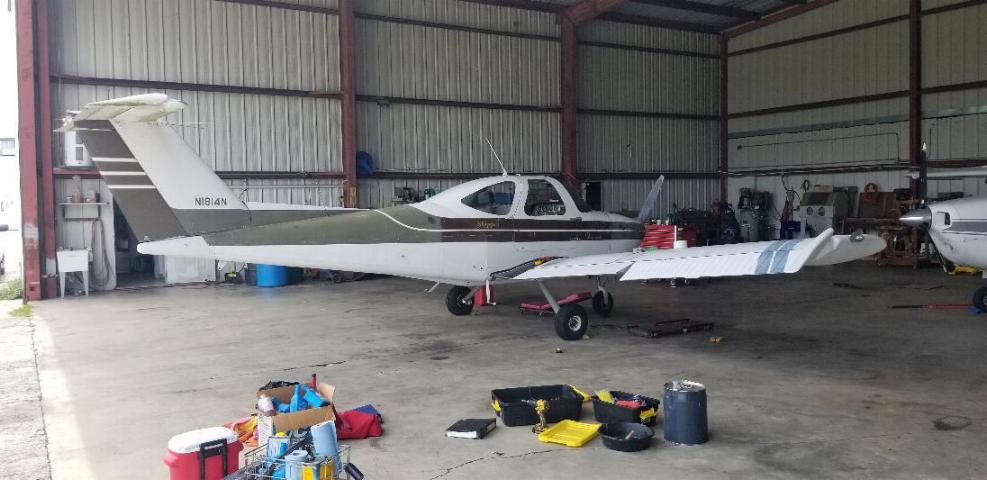
Skipper in the maintenance hangar at KISM.
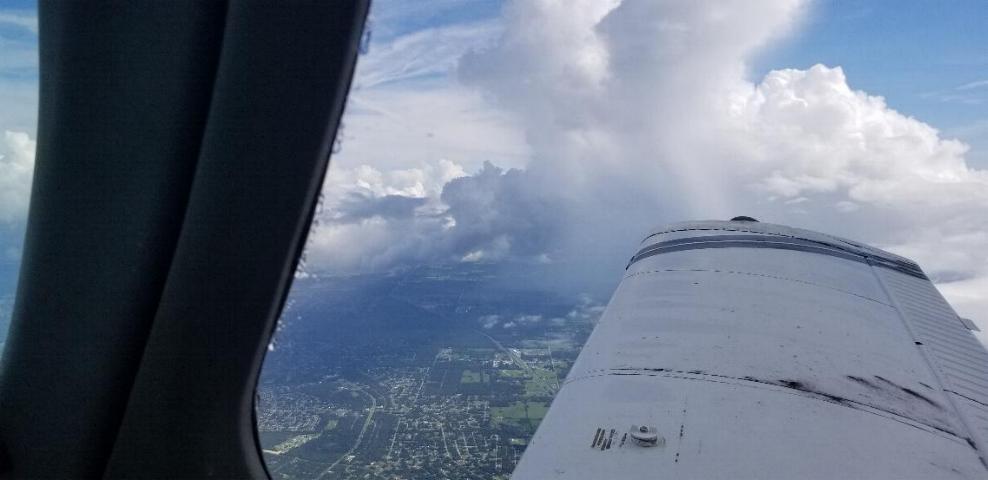
I spent a lot of time flying around stuff like this. Note the mold growing on top of the wing. Yuck!
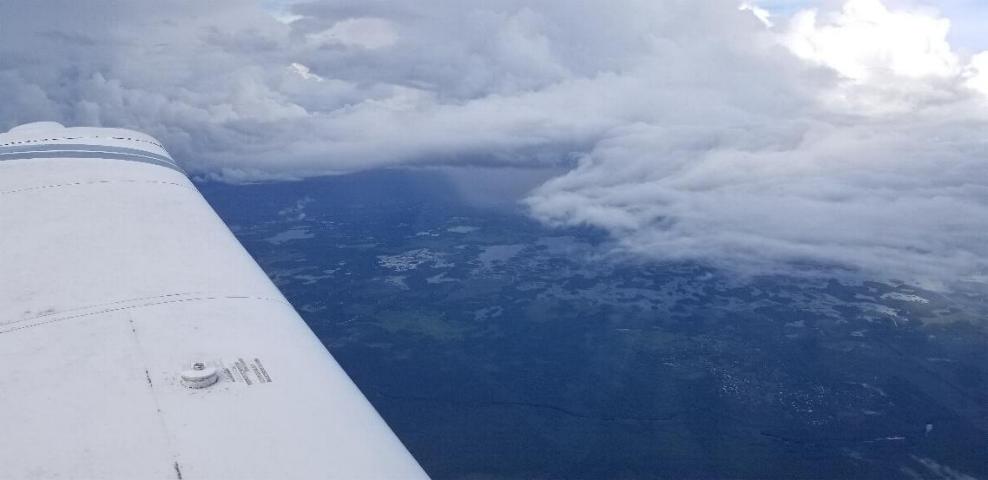
You can see the rain in the swamp under the clouds looking from 8500'. Not a place I would want to have to perform a forced landing.
First fuel stop was in Bainbridge, GA after 3 hours in the air. The engine had sucked down a quart of oil. I topped off the oil and gas, then taxied out for departure. The remnents of the pitot line apparently failed during take off, so I found myself airborn with no air speed indicator. This is far from the first time I've had the airspeed fail in a plane, and this is a pretty easy to fly trainer. So, my decision was to either go back around and land in Bainbridge to disassemble the wing and attempt to repair the ASI, or make two more landings, one at my next fuel stop in Starkville, MS and the next at home. I have flown into Starkville a number of times and knew they had a long runway with clear approaches, so I could fly a very conservative approach and departuer, and I know my home airfield quite well, so I chose to go on. That really was the end of the failures for the day. The plane flew and performed reasonably well for the remainder of the trip. I landed 3 hours later in KSTF to refuel. When I stopped in Starkville, the oil consumption was still a bit high, but some engines just don't like to have a full sump. I decided it had plenty of oil, so I'd see how it did on oil consumption if I ran the oil level in the sump a bit lower. I turns out that was a good decision as it only consumed 1/4 of a quart in the last 2.8 hours, which is an acceptable consumption rate. Now it's at the end of the ferry flight. It doesn't fly again until it is in proper airworthy condition. So we have a lot of work ahead of us.
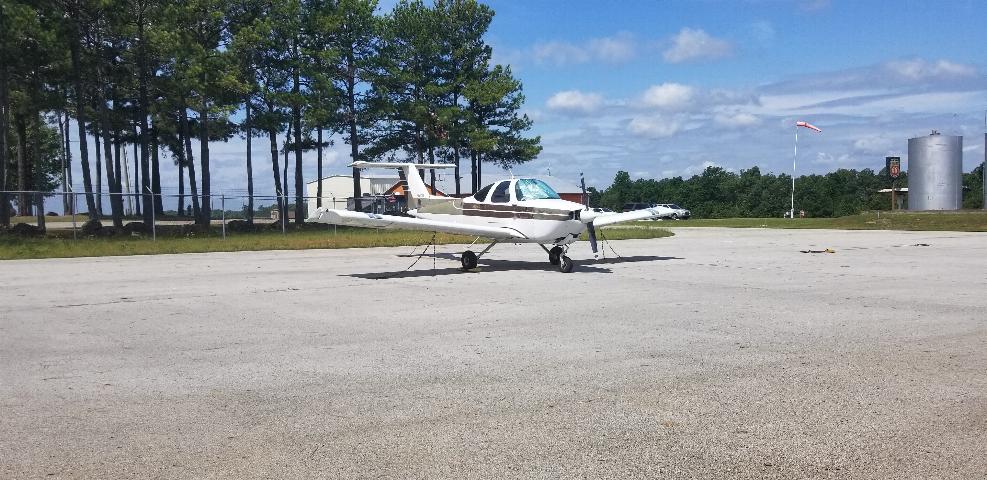
I was glad to get it to AR, but what a sad looking plane. It's in rough condition, but with a bit of work, it should be a nice plane again. The new owner has a sideline of buying old cars and motorcycles, cleaning them up and reselling. He may be just the owner this plane needs. Sitting out in the weather in Orlando for the last 6 years and out in the sun in NM for the previous 13 years has really taken it's toll on this little plane.
The new owner and his wife came by the airport the next weekend and spent a day scrubbing this plane inside and out. Kevin scrubbed all the mold and nasty mess off the outside, while Jody scrubbed all the mildew and mold out of the inside. It looked (and smelled) much better after a good scrubbing. Then we left it parked for a couple of weeks while Kevin went to Oshkosh for the big show, and I attended to other things in life. But now it is working it's way through an annual inspection.
#1 priority was to check on the condition of the engine. The mechanic in Florida had declared that I would "destroy that engine" if I so much as started it. When I asked if he had ever run it, he said he hadn't. It's pretty clear he didn't know anything about this plane, and was just trying to get himself a job disassembling the plane rather than doing anything helpful, so we ended any relationship with him at this point in time. I had done a top overhaul on this engine back in the early 2000s and remembered that I had put it together with chrome cylinders, so I really wasn't worried about corrosion in the cylinders. The metallergy between the cam and cam followers is also different in the O-235 vs the other Lycomings, so I didn't know what I would find with the camshaft. So, after 8.8 hours of run time flying it home, that should have been enough time that if it was going to start making metal, it should be showing up in the oil filter. So the first maintenance item was to remove the oil filter and cut it apart to inspect for metal and/or other debris. It was clean as can be. Nothing in the filter but oil. My take on it is that the cam and cam followers are good. So, we continued on with doing a 100 hr inspection on the engine. When we picked this plane up in Florida, it had 24 hours of flight time on it since I last did a 100 hr on the engine in 2015. And half of that time was the flight to move the plane from Los Alamos, NM to Kissimmee, FL. The engine only has 150 hours on it since I topped it at least 15 years ago. Not very good for an engine or plane, but I'm feeling pretty good about having put chrome cylinders on it way back when!

The Skipper, (which I dubbed "The Corrosion Queen", but the owners wife has named "Mary Ann") in my hangar at Sharp County Airport.
I proceeded to move forward with the 100 hr inspection on the engine. Overall, the engine is actually in pretty good condition. We had to drain the fuel out of the tanks so we could repair the leaking fuel drain, so I wasn't able to run the engine before pulling the compressions. On a cold compression check with the engine not having been started in 3 weeks, it checked all upper 60s to mid 70s. More importantly, all leakage was through the rings, which were dry from not running. So that's a pass for sure. We replaced the vacuum pump, which had failed while I was still in Florida, and replaced the air filter, which we had washed and oiled in Florida for the trip home, but was in pretty rough condition. The filters in the gascolator and electric fuel pump both had some debris and water, but the inlet filter in the carb was still nice and clean. I adjusted the valves and inspected and lubricated everything that calls for inspection and lubrication. Overall, the engine got a passing grade on the 100 hr inspection, so now we are on to the airframe.
The most painful part of this whole ordeal is the leaky fuel drain. For some reason only known to some obscure Beech Engineer, Beechcraft decided to use flush fuel drains in this aircraft. I don't know why. It's a slow draggy trainer. They have big round pipes sticking up out of the tanks for filler necks. But installed flush fuel drains. We had already gone a round with the fuel drain while in Florida and had lost. But losing was not an option to get it through annual. We had to replace that drain. I was envisioning needing to cut an access panel into the tank like I had done on my RV to gain access for repairs. It was a nighmare that took 2 days to win, most of which was Kevin's patience working with it.
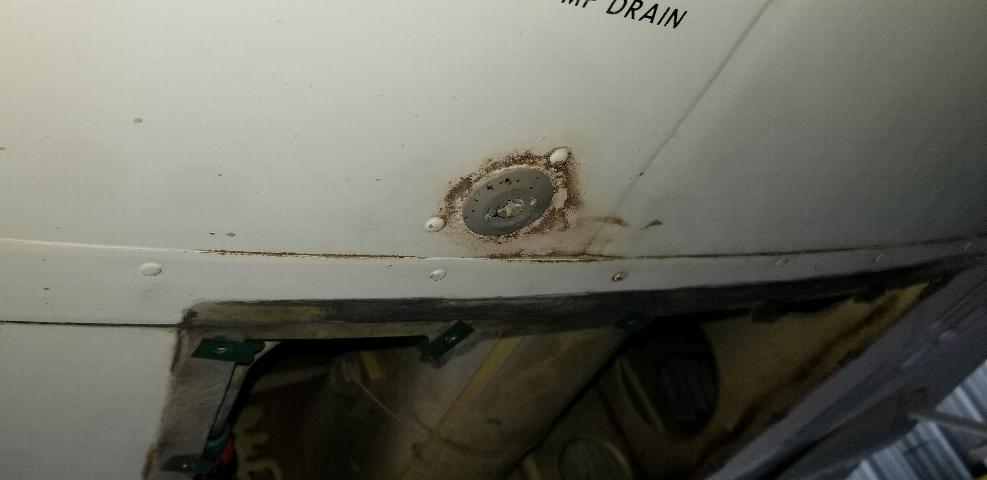
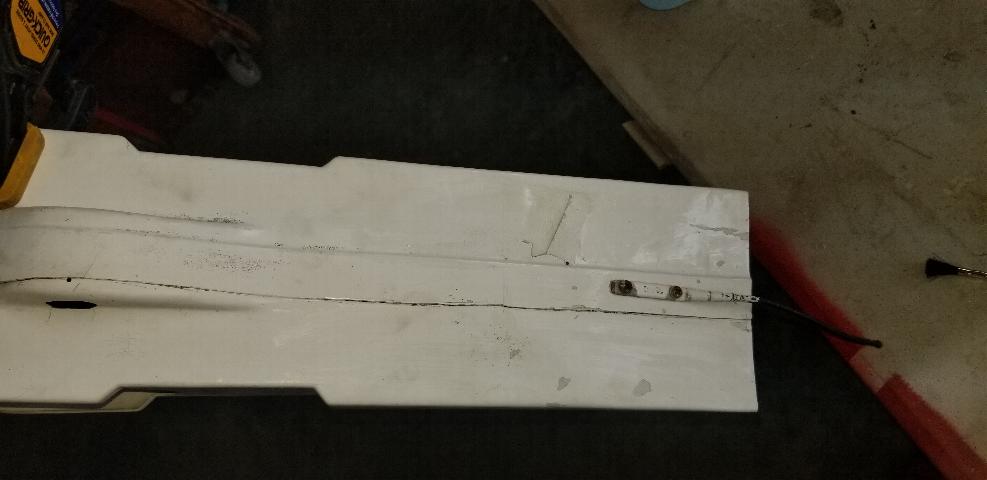
So here is what the flush fuel drain looks like. This is a 3/4-16 thread up into a captive nut inside the tank. This photo is of the left side drain that is still functional. The holes on either side of the drain hole in the center is all you have to get onto it to remove this drain. It seals against the bottom of the wing skin with an O-ring, then has an internal O-ring that seats to close off the drain. The drain has to be removed to change the internal O-ring, or can be screwed partially out to change the external O-ring seal. We couldn't get this one to move at all. Kevin bought a spanner wrench with different sized pins that screwed through it that would go into the pin holes in the part. We used a floor jack pushing up agains the spanner wrench to keep it seated in the pin holes and managed to get the nut started turning. Then we heard something pop inside the wing. The captive nut had escaped and was no longer captive, but instead was turning inside the fuel tank. The filler neck is at the other end of the tank with baffles between it and the drain, so the only access was to work through the hole where the fuel gauge tank unit goes.
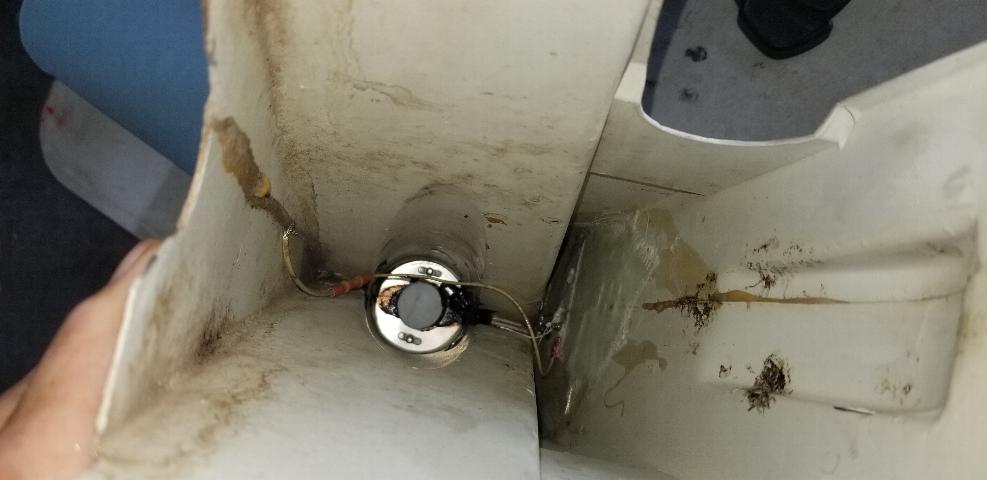
So, you can see the new drain obviously installed in the bottom of the tank. The tank unit is the part with 5 bolts attaching it to the side of the tank above the fuel drain. First we stuck my boroscope in through the 1-1/2" hole for the tank unit and got a good look at the nut and retainer. Kevin went to the auto parts store and bought a package full of odd shaped pins and drivers that could be used to jam between the no longer captive nut and the back of the tank. We heated and bent the tools even more until we came up with a tool Kevin could get into position. It took a full day of soaking the nut with penetrating oil, then working it a bit against the jammed nut to work that fitting out. Then, of course, the nut was buggered up a bit and the new drain wouldn't thread in readily. Kevin fixed that with a 3/4-16 tap and worked that through the nut with it still jammed in place. Also, the new fuel drain still has to seal against the skin, which was in kind of rough shape. So, I sanded the skin a bit to clean and polish it, acid etched and primed it for a tank sealer, then laid a small bead of ProSeal for the O-ring to seat into to seal the fuel drain to the wing.
Here is the finished product. A nice new drain with a hex head that you can put a wrench or socket on to, seated into a bed of ProSeal. My expectation is that this should work just fine, but when it has to be removed again, it may require removing the tank unit and going inside with an odd shaped tool to jam the nut. I suggested to Kevin that he might want to change out the still functioning left fuel drain. He failed to see the humor in that suggestion.
Here is that pesky pitot line after replacing. Note that the pitot line threads through a grommet in every rib going through the wing below. That was a bit of a challenge to deal with.
Every rib has a grommet like the one pictured here and the old line was so rotten it couldn't be used to pull it through. I welded 4 - 3' welding rods together and fed thm through the ribs, then attemped to slide the 1/4" line over the welding rods. That didn't work, so I bent a loop into the end of the last rod and sewed a piece of rib stitch cord through the end of the tube, then Kevin pulled the welding rods through from the other end to drag the pitot line through the rib grommets in the wing. It attaches to a metal tube in the fuselage aft of the cockpit. The heating element was also bad in this pitot tube. I had a couple of these pitot tubes laying around that came off from some salvage wrecks, so installed a new heated pitot. Of course if he ever needs the heated pitot because he's in ice, he is already in deep trouble.
Next project was the wing tips. They were a mess. They are plastic tips that are now 40 years old, with lots of puckers, chips and cracks. Also, they were attached to the wings using sheet metal screws through the thin aluminum skin and most were stripped. So, we added #8 tinnerman nut plates to the wing tips for mounting the tips and will re-install the tips with all new #8 screws.
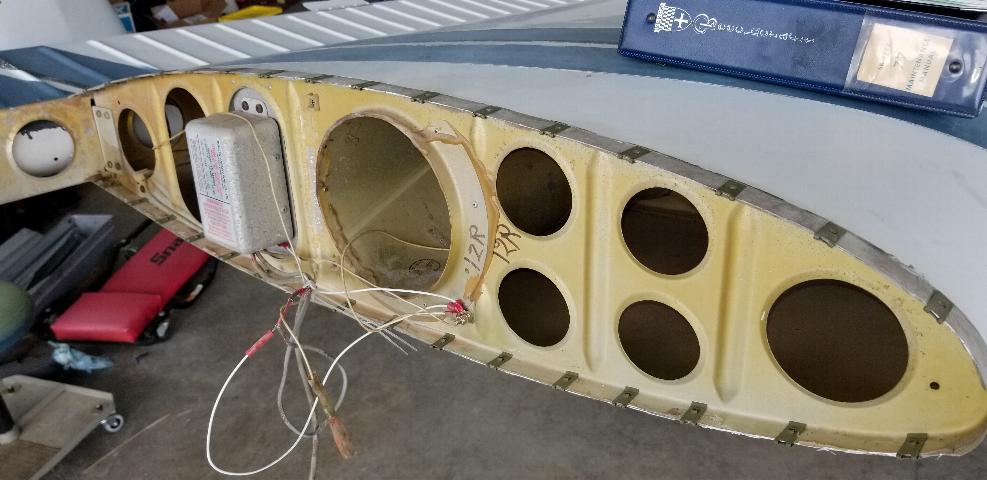
Tinnerman nut plates for mounting the wing tips. This strobe power supply was also bad. It was full of water. Kevin found a used one on ebay for a reasonable price.
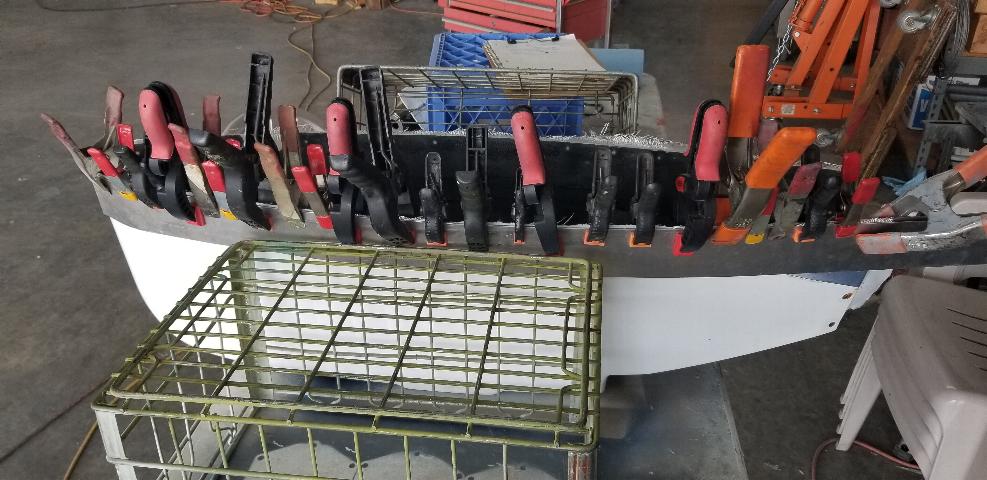
I decided to attempt to reform the puckered and cracked wing tips with fiberglass. I laid up 3 layers of 5.8 oz tooling glass, then peel ply around the perimeter of the inside of the wing tips. I waxed these strips of .050" 6061T6 aluminum to use as an inner and outer mold, then clamped the edge of the wing tip and laid it out in the sun to cure. The results were surprisingly good with all the wavy puckers being squeezed out of the wing tips and held in place by the stronger fiberglass. The wing tips are now .030" thicker around the perimeter, so this may affect the fit of the tips and may require moving some of the mounting holes. We haven't attempted to fit them yet, so don't know at this time how good or how bad the fit will be. If it's really bad, we can always sand down the glass on the inside of the tips.
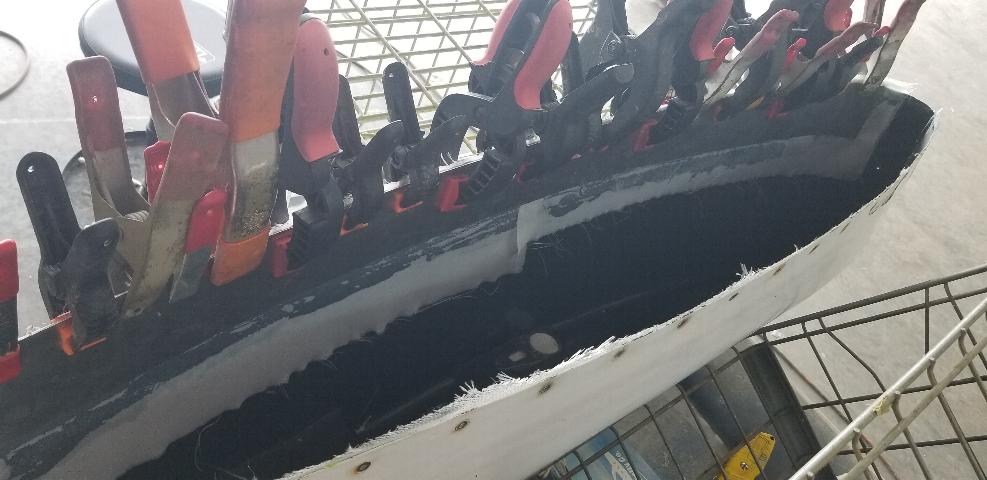
Clamped up formers molding the tip. You can see the near side is already completed other than trimming the glass..
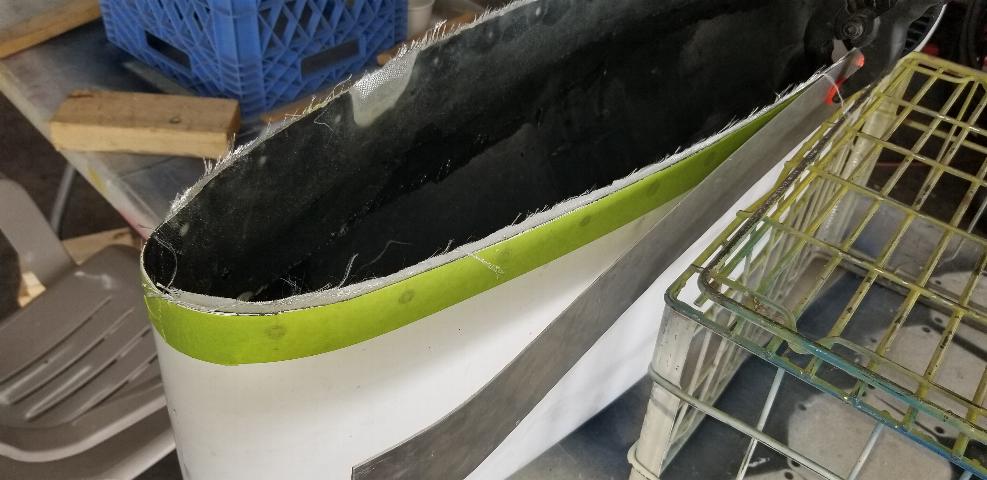
Completed glass work. I still need to trim and pull the masking tape.
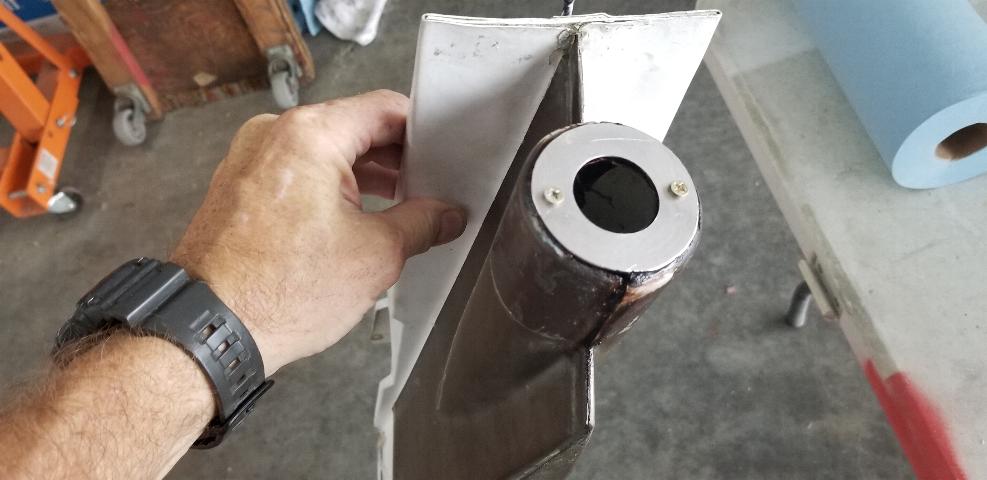
The plastic cap and tail light mount that goes up over the T tail was also in really rough condition. I made a new mount for the tail light. I have an aluminum disk mounted both inside and outside of the part with it bedded in milled fibers mixed with resin and dyed brown to match the existing paint. You can also see the seam in this part has split apart and is bonded back together with the brown died milled fibers and resin.

This board is jamed in here to hold a piece of aluminum that has been waxed and is in place to hold a glass patch to repair a hole that has been punched into the top of this piece. You can also see the back side of the tail light mount here.
The crack in the top of this part is now backed up by a 2 lay up fiberglass patch. This top seam had broken apart as well, so is bonded back together with white dyed milled fibers and resin.
Inside of tail light mount and fiberglass patch below the hole in the top of this piece can be seen on the inside to the right of the tail light mount. I know the patch looks rough, but it's so far down this little hole that I couldn't get my hands down to it, so had to manipulate it with tools while laying it up.
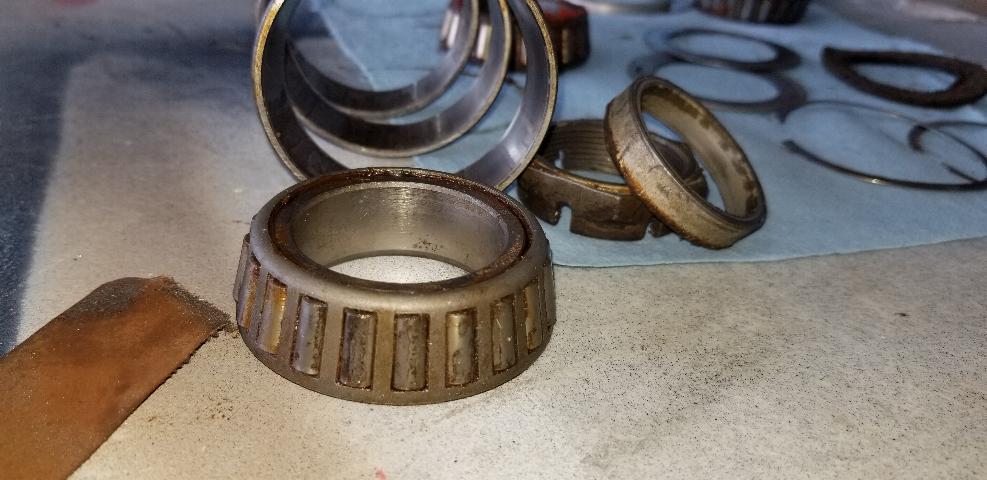
Next is the wheels and bearings. What can I say. It's the Corrosion Queen. All the bearings and races in both mains and the nose wheel are junk. Note the rust pitting on the face of this bearing. The races all have pitting in them as well. Some of the bearings actually had water in them when I took them apart.
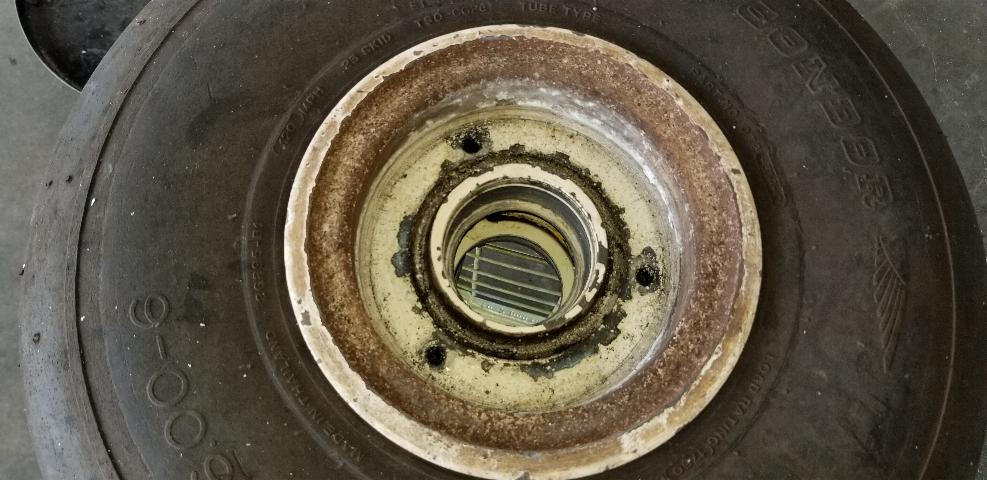
There was a lot of rust on what had been new brake discs. When I went to remove the brake discs, I couldn't get them out. They were jammed with galvanic corrosion between the steel brake disc and the aluminum wheel. This is a photo of the aluminum wheel where I had just pulled the brake disc out. It was all cleaned up, treated and painted to prevent further corrosion before reassembly. The 5606 hydraulic fluid in the brakes was also heavily contaminated with what looks like oil. I cleaned the exact same mess out of the brakes on this plane in 2015. I couldn't find any source or explanation for how oil got into the brake system, but I this is a repeat problem with no cause found. What was in the slave cylinders looked more like brown viscous oil than red low viscosity hydraulic fluid. We flushed out the system, dismantled the slave cylinders and cleaned them, then reassembled and charged with 5606. We'll see if this problem develops again. I'm hoping this was some residue from someone having put oil in there by mistake years ago. I know the last owner knew to use 5606 as he even gave us a quart of 5606 with the plane.
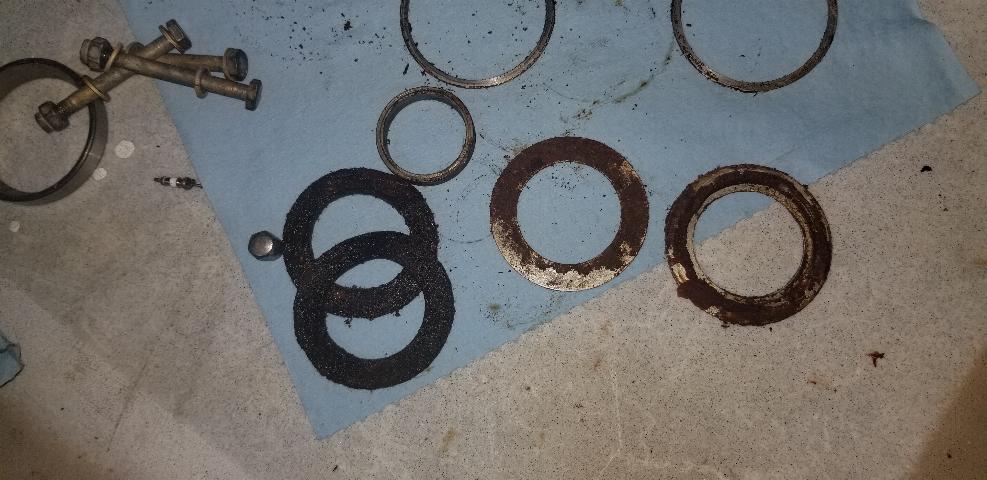
And then we pulled the nose wheel. The steel washers had rusted so much that the rust had infiltrated the felt grease seals, effectively destroying the felt seals as well as the steel washers that are to retain them. We have new seals and washers on order. The nose wheel is magnesium and suffered some pretty serious corrosion damage around these seals, but cleaned up well enough that I don't believe they will fail or be unsafe. But my, what a mess.
OK. A little rant here!
A little more information on the mess that was the nose wheel. According to the log books, when I did the inspection on this plane in 2015, I replaced the nose wheel tire and tube with a brand new. The plane has 33.5 hours of flight time on it since I installed a new tire, but when we picked up the plane in 2021, it had an old tire that was worn smooth with a used tube in it that was also junk and an $1100 nose wheel that is badly damaged with corrosion. There were two other identical Skippers on the field there in Kissimmee. I should have walked over and looked at them as I could have easily have identified the thief that had stolen the nose wheel and left this junk wheel and tire on this plane. That kind of stuff just simply makes me angry. I wouldn't have hesitated to have traded the wheels back and left the thief with his original worn out and corroded junk. I'd like to believe pilots are a cut above common thieves, but apparently that is not the case in Kissimmee, Florida.
Other issues. Every fastener on this plane is rusty. All the cam locs on the cowling will be replaced. All the screws that attach inspection panels all over the plane as well as cowling and wing tips and tail tip will be replaced. Any machine screws will be replaced with cad plated machine screws. Any sheet metal screws will be replaced with stainless. More photos to come, but it's looking like we may be able to turn this mess into a nice little airplane again in the next week or two.
Nearly done. Just waiting on the new grease seals to show up for the nose wheel bearings. Note how the brown paint has been bleached out by the sun, but the extreme oxidization has been scrubbed off to where the paint now matches. Compare this to some of the photos above from Florida or the first photo after arriving in Arkansas.
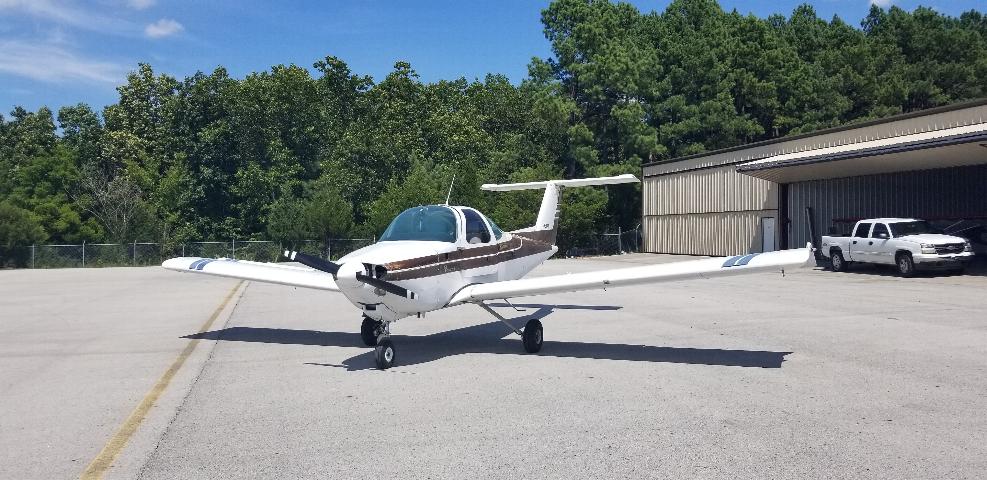
Completed and out of the hangar. New paint on the prop. Wing tips glassed and painted. Interior cleaned up to like new. It's a nice plane again.
And this is really where this plane belongs. In this photo, the new owner is on his way to put the plane away in it's new home in West Plains, MO. This is the first time this poor plane has been hangared since 2002. The elements were not kind to it, but I think we did a pretty good job of saving it from the bone yard. The plane is now in the hands of an owner that is capable with a wrench and cares about keeping the plane nice. I expect it's condition will continue to improve while he owns it.
The Skipper in happier days around 2002 parked next to the Tomahawk I owned at the time.
In flight near Los Alamos, NM 2002.
Here is the state the plane was in when we arrived in Florida in early July. This is the new owner either admiring his new purchase, or looking on in horror at what was in front of him. Yes, that is mold all over the canopy cover, and the wings, and the tail. The right door was left ajar, so the interior was soaked and mildewed. The flush mounted drain in the right wing tank was leaking fuel and couldn't be readily repaired, or removed. The engine had fouled plugs and water in the fuel tanks, but the fuel had leaked out anyway, so all that was left was some water. We splashed some gas in it and hand propped it to taxi over to a maintenance hangar where we spent the day working on it. With all the moisture inside and out, every contact was flaky. Master switch, radio switches and pots, headset plugs, you name it. It was all a bit flaky and problematic. It got a new battery and a lot of attention to small things. The leaking fuel drain simply was not repairable in the time frame we had to work with. I injected the end of the fuel drain with quick set JB weld, then taped over the drain with Gorilla tape and wrapped the tape up around the leading edge to keep it from peeling. That stopped the leak, so we fueled it up and thought we had it ready to go. The next morning, I aborted the first take off roll with no airspeed indicator. We removed the right wing tip and found the line from the pitot tube that runs through the wing was rotten and had failed up inside the wing. We used a piece of PVC pipe inserted through the wing to route a new piece of 1/4" tubing through the wing, but couldn't readily reach the fitting at the fuselage to terminate the new piece, so chose to splice the new tube to the old tube just short of the fuselage. It worked OK, so I was off again. ADS-B equipment exception was filed; Ferry permit in hand; I taxied out for take off. As I was taxiing out, I noticed that the gyro instruments fogged over on the inside. At this point in time, one should note that the Beech Skipper uses pressure rather than vacuum from the vacuum pump to run the gyros. So, the air was coming through the pump and turning into steam, which told me the vacuum pump was likely heating up due to corrosion inside the pump and would likely fail soon. It did. I noted the instrument pressure had gone to zero before I was out of sight from the runway. The gyros continued to spin for some time, which actually bodes well for their condition. Additionally, ATC said the transponder was working correctly and reporting the correct altitude. That was an unexpected bonus! So, off I went to do battle with the thunderstorms roaming across Florida around and north of the Orlando area.
Skipper in the maintenance hangar at KISM.
I spent a lot of time flying around stuff like this. Note the mold growing on top of the wing. Yuck!
You can see the rain in the swamp under the clouds looking from 8500'. Not a place I would want to have to perform a forced landing.
First fuel stop was in Bainbridge, GA after 3 hours in the air. The engine had sucked down a quart of oil. I topped off the oil and gas, then taxied out for departure. The remnents of the pitot line apparently failed during take off, so I found myself airborn with no air speed indicator. This is far from the first time I've had the airspeed fail in a plane, and this is a pretty easy to fly trainer. So, my decision was to either go back around and land in Bainbridge to disassemble the wing and attempt to repair the ASI, or make two more landings, one at my next fuel stop in Starkville, MS and the next at home. I have flown into Starkville a number of times and knew they had a long runway with clear approaches, so I could fly a very conservative approach and departuer, and I know my home airfield quite well, so I chose to go on. That really was the end of the failures for the day. The plane flew and performed reasonably well for the remainder of the trip. I landed 3 hours later in KSTF to refuel. When I stopped in Starkville, the oil consumption was still a bit high, but some engines just don't like to have a full sump. I decided it had plenty of oil, so I'd see how it did on oil consumption if I ran the oil level in the sump a bit lower. I turns out that was a good decision as it only consumed 1/4 of a quart in the last 2.8 hours, which is an acceptable consumption rate. Now it's at the end of the ferry flight. It doesn't fly again until it is in proper airworthy condition. So we have a lot of work ahead of us.
I was glad to get it to AR, but what a sad looking plane. It's in rough condition, but with a bit of work, it should be a nice plane again. The new owner has a sideline of buying old cars and motorcycles, cleaning them up and reselling. He may be just the owner this plane needs. Sitting out in the weather in Orlando for the last 6 years and out in the sun in NM for the previous 13 years has really taken it's toll on this little plane.
The new owner and his wife came by the airport the next weekend and spent a day scrubbing this plane inside and out. Kevin scrubbed all the mold and nasty mess off the outside, while Jody scrubbed all the mildew and mold out of the inside. It looked (and smelled) much better after a good scrubbing. Then we left it parked for a couple of weeks while Kevin went to Oshkosh for the big show, and I attended to other things in life. But now it is working it's way through an annual inspection.
#1 priority was to check on the condition of the engine. The mechanic in Florida had declared that I would "destroy that engine" if I so much as started it. When I asked if he had ever run it, he said he hadn't. It's pretty clear he didn't know anything about this plane, and was just trying to get himself a job disassembling the plane rather than doing anything helpful, so we ended any relationship with him at this point in time. I had done a top overhaul on this engine back in the early 2000s and remembered that I had put it together with chrome cylinders, so I really wasn't worried about corrosion in the cylinders. The metallergy between the cam and cam followers is also different in the O-235 vs the other Lycomings, so I didn't know what I would find with the camshaft. So, after 8.8 hours of run time flying it home, that should have been enough time that if it was going to start making metal, it should be showing up in the oil filter. So the first maintenance item was to remove the oil filter and cut it apart to inspect for metal and/or other debris. It was clean as can be. Nothing in the filter but oil. My take on it is that the cam and cam followers are good. So, we continued on with doing a 100 hr inspection on the engine. When we picked this plane up in Florida, it had 24 hours of flight time on it since I last did a 100 hr on the engine in 2015. And half of that time was the flight to move the plane from Los Alamos, NM to Kissimmee, FL. The engine only has 150 hours on it since I topped it at least 15 years ago. Not very good for an engine or plane, but I'm feeling pretty good about having put chrome cylinders on it way back when!
The Skipper, (which I dubbed "The Corrosion Queen", but the owners wife has named "Mary Ann") in my hangar at Sharp County Airport.
I proceeded to move forward with the 100 hr inspection on the engine. Overall, the engine is actually in pretty good condition. We had to drain the fuel out of the tanks so we could repair the leaking fuel drain, so I wasn't able to run the engine before pulling the compressions. On a cold compression check with the engine not having been started in 3 weeks, it checked all upper 60s to mid 70s. More importantly, all leakage was through the rings, which were dry from not running. So that's a pass for sure. We replaced the vacuum pump, which had failed while I was still in Florida, and replaced the air filter, which we had washed and oiled in Florida for the trip home, but was in pretty rough condition. The filters in the gascolator and electric fuel pump both had some debris and water, but the inlet filter in the carb was still nice and clean. I adjusted the valves and inspected and lubricated everything that calls for inspection and lubrication. Overall, the engine got a passing grade on the 100 hr inspection, so now we are on to the airframe.
The most painful part of this whole ordeal is the leaky fuel drain. For some reason only known to some obscure Beech Engineer, Beechcraft decided to use flush fuel drains in this aircraft. I don't know why. It's a slow draggy trainer. They have big round pipes sticking up out of the tanks for filler necks. But installed flush fuel drains. We had already gone a round with the fuel drain while in Florida and had lost. But losing was not an option to get it through annual. We had to replace that drain. I was envisioning needing to cut an access panel into the tank like I had done on my RV to gain access for repairs. It was a nighmare that took 2 days to win, most of which was Kevin's patience working with it.
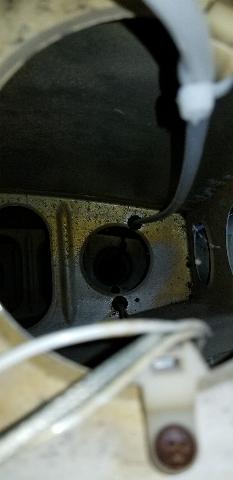
So here is what the flush fuel drain looks like. This is a 3/4-16 thread up into a captive nut inside the tank. This photo is of the left side drain that is still functional. The holes on either side of the drain hole in the center is all you have to get onto it to remove this drain. It seals against the bottom of the wing skin with an O-ring, then has an internal O-ring that seats to close off the drain. The drain has to be removed to change the internal O-ring, or can be screwed partially out to change the external O-ring seal. We couldn't get this one to move at all. Kevin bought a spanner wrench with different sized pins that screwed through it that would go into the pin holes in the part. We used a floor jack pushing up agains the spanner wrench to keep it seated in the pin holes and managed to get the nut started turning. Then we heard something pop inside the wing. The captive nut had escaped and was no longer captive, but instead was turning inside the fuel tank. The filler neck is at the other end of the tank with baffles between it and the drain, so the only access was to work through the hole where the fuel gauge tank unit goes.
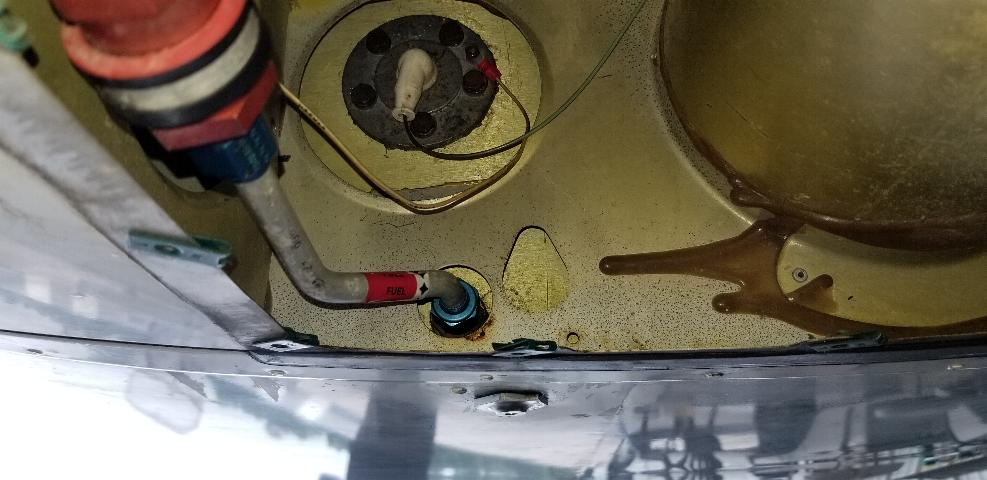
So, you can see the new drain obviously installed in the bottom of the tank. The tank unit is the part with 5 bolts attaching it to the side of the tank above the fuel drain. First we stuck my boroscope in through the 1-1/2" hole for the tank unit and got a good look at the nut and retainer. Kevin went to the auto parts store and bought a package full of odd shaped pins and drivers that could be used to jam between the no longer captive nut and the back of the tank. We heated and bent the tools even more until we came up with a tool Kevin could get into position. It took a full day of soaking the nut with penetrating oil, then working it a bit against the jammed nut to work that fitting out. Then, of course, the nut was buggered up a bit and the new drain wouldn't thread in readily. Kevin fixed that with a 3/4-16 tap and worked that through the nut with it still jammed in place. Also, the new fuel drain still has to seal against the skin, which was in kind of rough shape. So, I sanded the skin a bit to clean and polish it, acid etched and primed it for a tank sealer, then laid a small bead of ProSeal for the O-ring to seat into to seal the fuel drain to the wing.
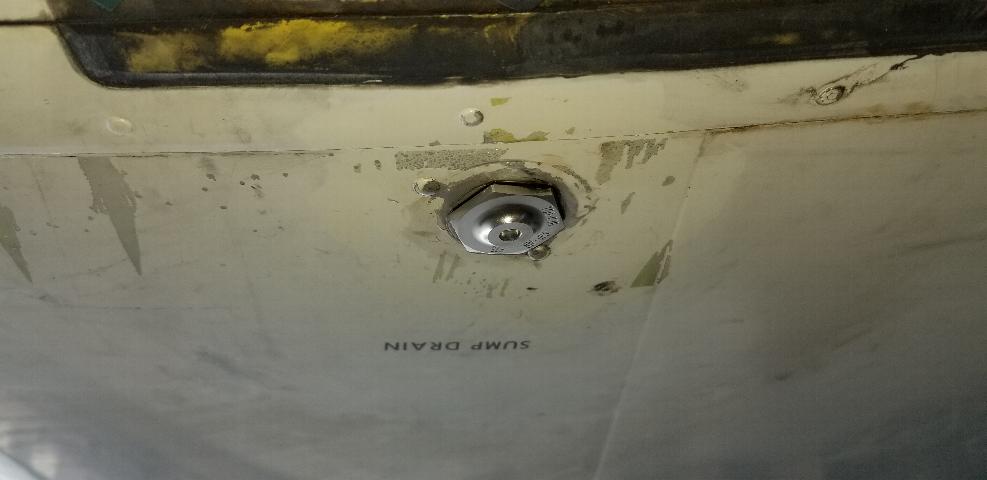
Here is the finished product. A nice new drain with a hex head that you can put a wrench or socket on to, seated into a bed of ProSeal. My expectation is that this should work just fine, but when it has to be removed again, it may require removing the tank unit and going inside with an odd shaped tool to jam the nut. I suggested to Kevin that he might want to change out the still functioning left fuel drain. He failed to see the humor in that suggestion.
Here is that pesky pitot line after replacing. Note that the pitot line threads through a grommet in every rib going through the wing below. That was a bit of a challenge to deal with.
Every rib has a grommet like the one pictured here and the old line was so rotten it couldn't be used to pull it through. I welded 4 - 3' welding rods together and fed thm through the ribs, then attemped to slide the 1/4" line over the welding rods. That didn't work, so I bent a loop into the end of the last rod and sewed a piece of rib stitch cord through the end of the tube, then Kevin pulled the welding rods through from the other end to drag the pitot line through the rib grommets in the wing. It attaches to a metal tube in the fuselage aft of the cockpit. The heating element was also bad in this pitot tube. I had a couple of these pitot tubes laying around that came off from some salvage wrecks, so installed a new heated pitot. Of course if he ever needs the heated pitot because he's in ice, he is already in deep trouble.
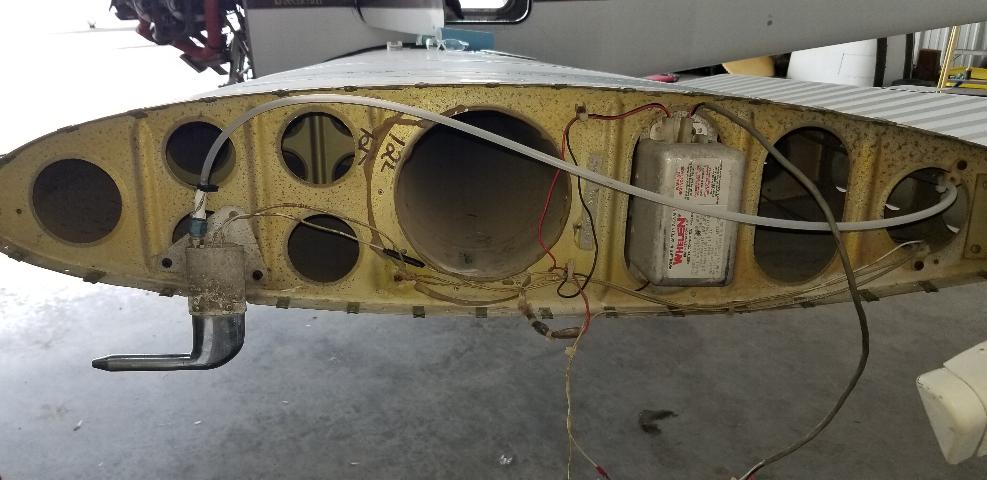
Next project was the wing tips. They were a mess. They are plastic tips that are now 40 years old, with lots of puckers, chips and cracks. Also, they were attached to the wings using sheet metal screws through the thin aluminum skin and most were stripped. So, we added #8 tinnerman nut plates to the wing tips for mounting the tips and will re-install the tips with all new #8 screws.
Tinnerman nut plates for mounting the wing tips. This strobe power supply was also bad. It was full of water. Kevin found a used one on ebay for a reasonable price.
I decided to attempt to reform the puckered and cracked wing tips with fiberglass. I laid up 3 layers of 5.8 oz tooling glass, then peel ply around the perimeter of the inside of the wing tips. I waxed these strips of .050" 6061T6 aluminum to use as an inner and outer mold, then clamped the edge of the wing tip and laid it out in the sun to cure. The results were surprisingly good with all the wavy puckers being squeezed out of the wing tips and held in place by the stronger fiberglass. The wing tips are now .030" thicker around the perimeter, so this may affect the fit of the tips and may require moving some of the mounting holes. We haven't attempted to fit them yet, so don't know at this time how good or how bad the fit will be. If it's really bad, we can always sand down the glass on the inside of the tips.
Clamped up formers molding the tip. You can see the near side is already completed other than trimming the glass..
Completed glass work. I still need to trim and pull the masking tape.
The plastic cap and tail light mount that goes up over the T tail was also in really rough condition. I made a new mount for the tail light. I have an aluminum disk mounted both inside and outside of the part with it bedded in milled fibers mixed with resin and dyed brown to match the existing paint. You can also see the seam in this part has split apart and is bonded back together with the brown died milled fibers and resin.
This board is jamed in here to hold a piece of aluminum that has been waxed and is in place to hold a glass patch to repair a hole that has been punched into the top of this piece. You can also see the back side of the tail light mount here.
The crack in the top of this part is now backed up by a 2 lay up fiberglass patch. This top seam had broken apart as well, so is bonded back together with white dyed milled fibers and resin.
Inside of tail light mount and fiberglass patch below the hole in the top of this piece can be seen on the inside to the right of the tail light mount. I know the patch looks rough, but it's so far down this little hole that I couldn't get my hands down to it, so had to manipulate it with tools while laying it up.
Next is the wheels and bearings. What can I say. It's the Corrosion Queen. All the bearings and races in both mains and the nose wheel are junk. Note the rust pitting on the face of this bearing. The races all have pitting in them as well. Some of the bearings actually had water in them when I took them apart.
There was a lot of rust on what had been new brake discs. When I went to remove the brake discs, I couldn't get them out. They were jammed with galvanic corrosion between the steel brake disc and the aluminum wheel. This is a photo of the aluminum wheel where I had just pulled the brake disc out. It was all cleaned up, treated and painted to prevent further corrosion before reassembly. The 5606 hydraulic fluid in the brakes was also heavily contaminated with what looks like oil. I cleaned the exact same mess out of the brakes on this plane in 2015. I couldn't find any source or explanation for how oil got into the brake system, but I this is a repeat problem with no cause found. What was in the slave cylinders looked more like brown viscous oil than red low viscosity hydraulic fluid. We flushed out the system, dismantled the slave cylinders and cleaned them, then reassembled and charged with 5606. We'll see if this problem develops again. I'm hoping this was some residue from someone having put oil in there by mistake years ago. I know the last owner knew to use 5606 as he even gave us a quart of 5606 with the plane.
And then we pulled the nose wheel. The steel washers had rusted so much that the rust had infiltrated the felt grease seals, effectively destroying the felt seals as well as the steel washers that are to retain them. We have new seals and washers on order. The nose wheel is magnesium and suffered some pretty serious corrosion damage around these seals, but cleaned up well enough that I don't believe they will fail or be unsafe. But my, what a mess.
OK. A little rant here!
A little more information on the mess that was the nose wheel. According to the log books, when I did the inspection on this plane in 2015, I replaced the nose wheel tire and tube with a brand new. The plane has 33.5 hours of flight time on it since I installed a new tire, but when we picked up the plane in 2021, it had an old tire that was worn smooth with a used tube in it that was also junk and an $1100 nose wheel that is badly damaged with corrosion. There were two other identical Skippers on the field there in Kissimmee. I should have walked over and looked at them as I could have easily have identified the thief that had stolen the nose wheel and left this junk wheel and tire on this plane. That kind of stuff just simply makes me angry. I wouldn't have hesitated to have traded the wheels back and left the thief with his original worn out and corroded junk. I'd like to believe pilots are a cut above common thieves, but apparently that is not the case in Kissimmee, Florida.
Other issues. Every fastener on this plane is rusty. All the cam locs on the cowling will be replaced. All the screws that attach inspection panels all over the plane as well as cowling and wing tips and tail tip will be replaced. Any machine screws will be replaced with cad plated machine screws. Any sheet metal screws will be replaced with stainless. More photos to come, but it's looking like we may be able to turn this mess into a nice little airplane again in the next week or two.
Nearly done. Just waiting on the new grease seals to show up for the nose wheel bearings. Note how the brown paint has been bleached out by the sun, but the extreme oxidization has been scrubbed off to where the paint now matches. Compare this to some of the photos above from Florida or the first photo after arriving in Arkansas.
Completed and out of the hangar. New paint on the prop. Wing tips glassed and painted. Interior cleaned up to like new. It's a nice plane again.
And this is really where this plane belongs. In this photo, the new owner is on his way to put the plane away in it's new home in West Plains, MO. This is the first time this poor plane has been hangared since 2002. The elements were not kind to it, but I think we did a pretty good job of saving it from the bone yard. The plane is now in the hands of an owner that is capable with a wrench and cares about keeping the plane nice. I expect it's condition will continue to improve while he owns it.