2013 Updates

Late February of 2013.  I took the KR out for a nice warm up flight and was once again so pleased with the way this plane flies, and the way this engine runs.  I have a number of updates I'd like to do to the plane, but just can't stand to ground a plane that flies so nice.  By afternoon, that tune had changed.

I pulled the plane in to start on what should have been a quick and easy annual inspection.  First thing was to do a quick compression differential check.  Nearly perfect, 79/80, 78/80, 79/80, and 58/80.  What?  That can't be right!  I checked a little closer and the news was not good.  It was leaking past the rings.  That does explain why the engine has been  pushing a bit more oil than expected.  One of these tired old  +.015 over cylinders has finally given up.  Surely it must be a broken ring.  I pulled the cylinder and saw nothing obviously wrong.  But measuring the cylinder, it has gone well beyond service limits and was showing some cylinder wall distortion.  It's time for new cylinders.

So, I got in contact with my friends at Aircraft Specialties and ordered a new set of Superior cylinders and a set of O-200-D pistons (8.5:1 compression rather than the 7.0:1 compression in the O-200-A).  Wow!  That was a surprise.  I didn't think Continental was going to make those pistons available.  I got into a real snag with the rings as Continental changed the top ring in the D pistons, then made them pretty much unavailable.  Finally resolved it by having my friend Doug machine the top ring groove to fit the ring set from the C-75 through O-200-A ring set. 

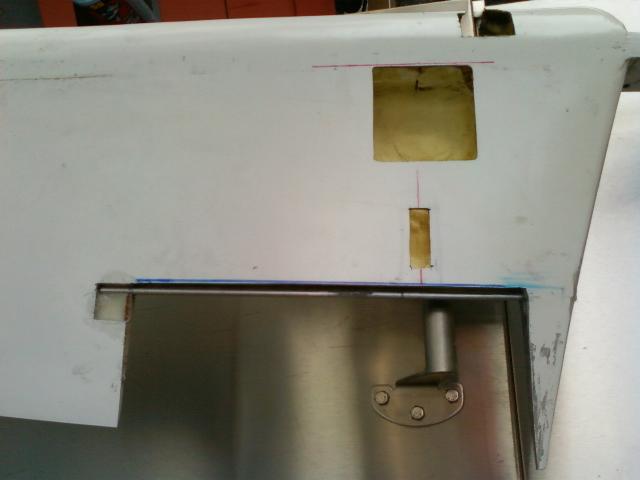
Now that the plane is already down for major maintenance, it's time to do all those little things I've been thinking about ever since the last major refit in 2005.


Elevator/Trim Tab


March 13 - I've never been happy with the spring biasing trim that I built for this plane in 2005.  It simply was
not effective and as the controls loaded up with speed, it became even less effective.  Time to remove the spring
trim and  install a trim tab.  I chose to put the trim tab in the right elevator because the right elevator clearly had an
internal delamination that I needed to fix.  I could address that problem while adding the trim tab.  First, I cut the
section that is to become the trim tab out of the elevator.  I am bonding the delam back together in the photo.


March 13 - Here is the new trim tab.  It also had the same internal delamination, so I am also bonding it back together.


March 17 - You can see that I added the control arm to the trim tab.  What you can't see very well here is
that I bedded a plywood rib into either end of the trim tab, then bedded a brass tube under this flox with each
end of the brass tube passing through the ribs to keep it captive.  The rod in the elevator  passes through the
brass tube to create the trim hinge.


March 18 - I taped the perimeter of the front of the trim tab and filled with a dry microballoon mix.  Tomorrow
I'll pull the tape off and sand the finish taper into the front edge of the tab.


March 17 - Here is the trim tab hinge.  This rod has the right end passing through the plywood rib in the elevator.  
The left end sits in a slot in a plywood rib I bonded along the edge of the trim tab cutout.  The rod then lays in a
bed of flox.


This cover holds the trim hinge in place.


Here is the cutout for the trim servo and the exit area for the servo rod.


Trim servo hole lined with glass and micro.  Also note that the hinge overlap is also lined with a new layer of
glass and micro.


March 20 - After cleaning up the micro in the hole, the trim servo now fits down into the elevator.  The control
rod will exit the slot between the servo and the tab and will get a fairing once it's in place.   The trim tab has had
a little reshaping done along the edges and the recess it seats into the elevator has also been reshaped.  This
photo also shows the aluminum plate screwed on to hold the trim tab hinge in place.  


Elevator right side up and trim to full nose down.  Note the cleaned up edge where the trim tab meets the elevator.


Trim to full nose up.


Neutral trim.  


March 23 - Trim servo and push rod to trim tab.


Fairing installed over top of push rod.


Filling with micro around the servo and fairing.  


March 24 - Final sanding for the tail.  Now it's ready for paint.


May 4 - Elevator painted and re-installed, now with a Ray Allen Servo actuated aerodynamic trim.

Update:  After a year of operations, this was a really good change to make.  A requirement for certificated
aircraft is that they should be able to land using the trim should the elevator linkage fail.  I could to it
with this trim, although it may not be a nice landing.

2 Year Update:  Same evaluation. 


Feel free to email me with comments or questions at jscott.planes"at"gmx.com.

Stay tuned.  More to come...

-Jeff