6/21/2025 - All the fabric covering and paint work is now completed.
Time to turn this pile of parts into an airplane again.


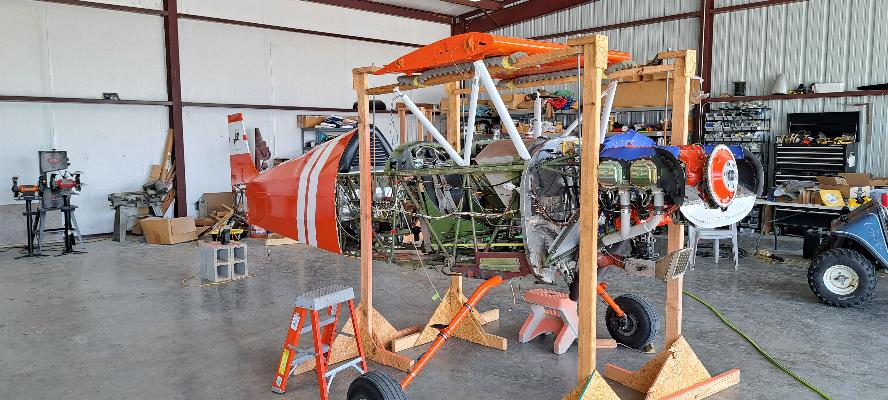
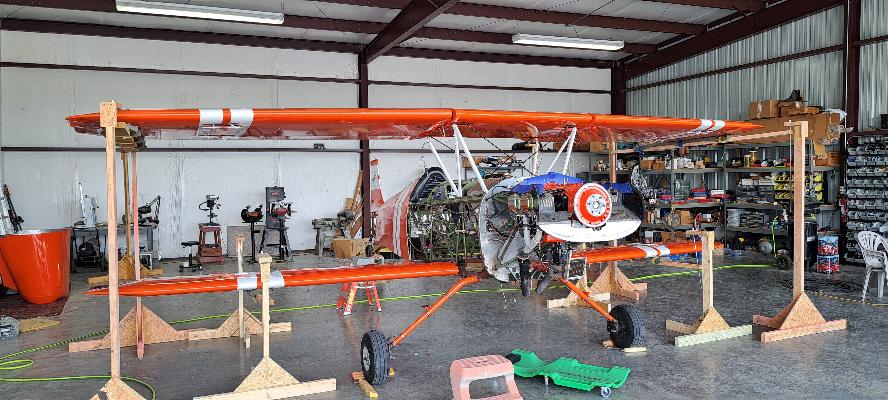
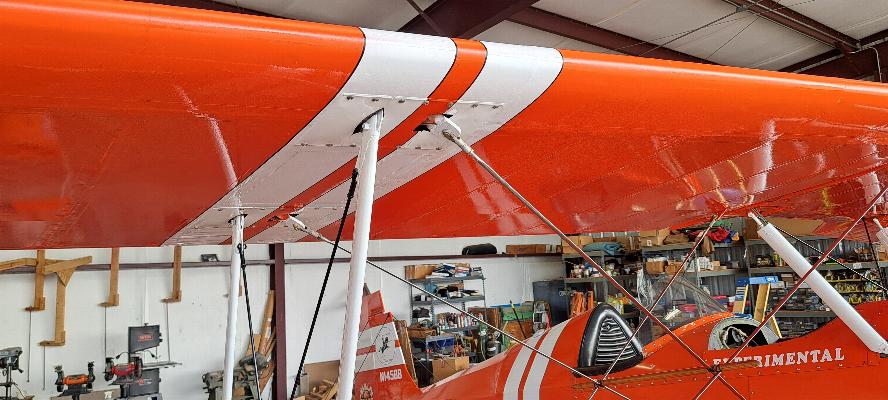
6/23/2025 - Mounting the Center Section of the upper wing today in
preparation for mounting the rest of the wings. Above, the center
section cabane struts are mounted to the fuselage. Below, I've
placed my wing jacks in place and had some help to set the center
section on the wing jacks. I can do the res by myself.
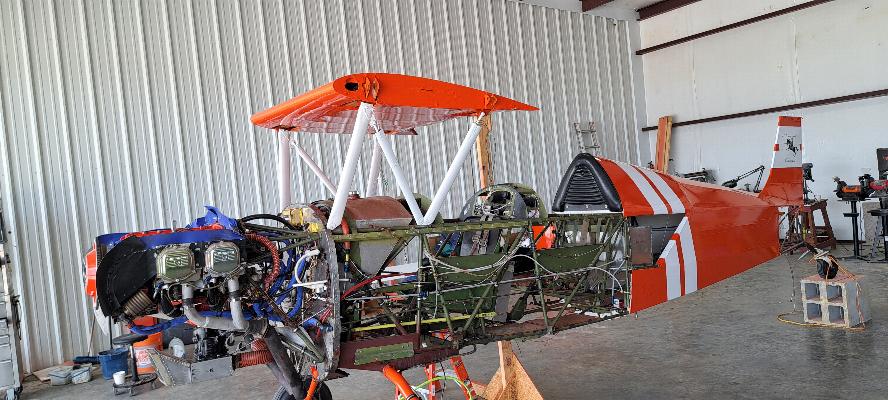
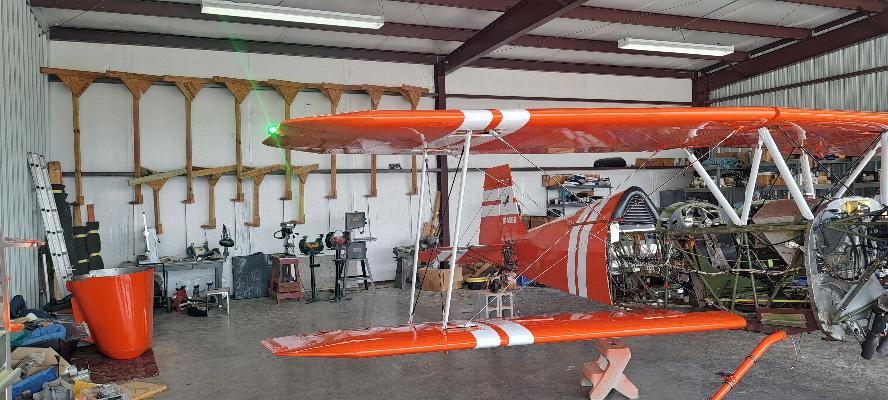
The Center Section now mounted to the cabane struts.

Now the cross braces are installed to make the center section mounting
rigid. It's now ready to support the landing wires as they
support the lower wings. The lower wings support the outboard
cabane struts and they, in turn, support the upper wings. There
is a process to assembling this puzzle.

6/24/2025 - I installed the ailerons onto the lower wings in preparation for hanging the wings back on the plane tomorrow.
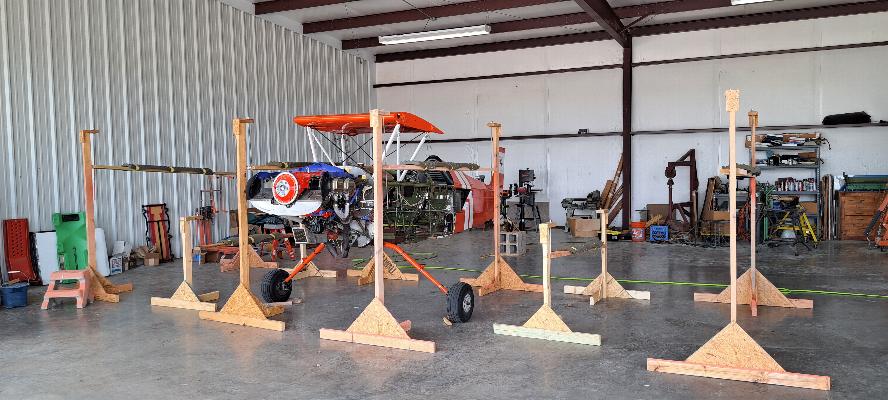
A forest of wing jacks in place to hold both the upper and lower wings
for reassembly. I am really excited to get the put the wings back
on tomorrow!
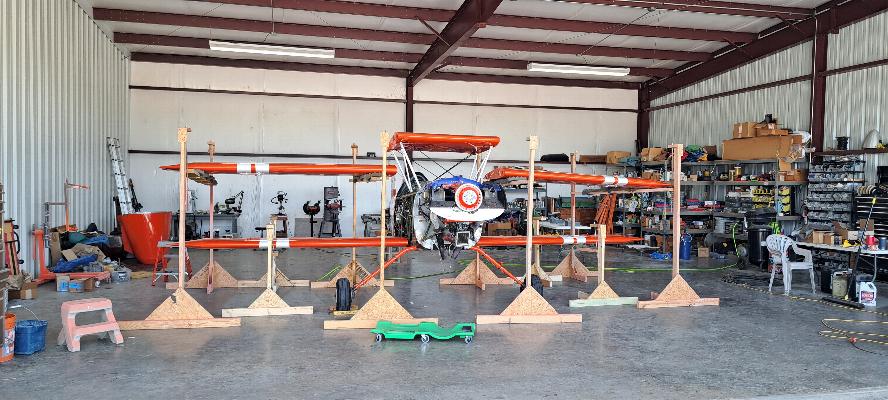
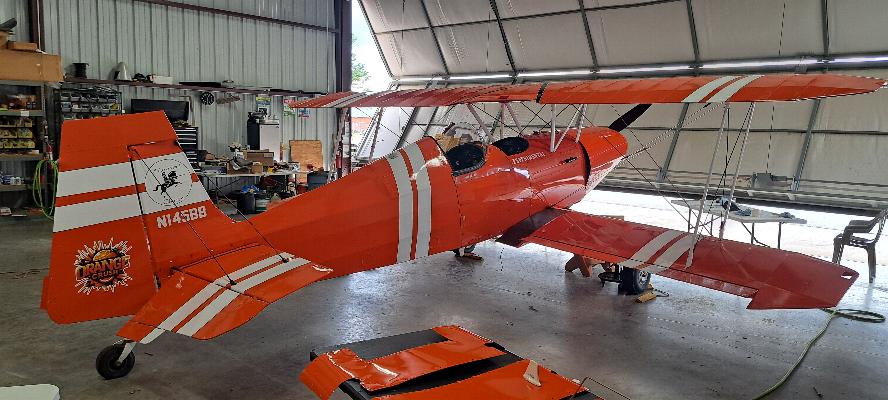
6/25/2025 - Hanging the wings! Lower wings are boolted to the
spar fittings and the wings are resting on the wing jacks about mid
span. The upper wings are resting on the wing jacks inboard and
outboard. All I have to do is run the jacks up and push the wings
into place, then put int he attach bolts.
Upper wings were pushed into place and bolted on at the spar fittings,
then the inner wing jacks were removed. Now all the wings are
attached at the spar fittings and the inboard wing jacks removed.
Now, it just needs some struts and wires.
First the white struts were installed, then the black cross brace wires
between the struts. The cross braces were adjusted to set the
angle of the struts to match between the two sides. Once the
struts and braces were installed, then the flying and landing wires wre
installed. It looks great, but I'm not happy with some of the
misfitting clevis pins that are in it. Allthe clevis pins were
retained exactly where they were removed from and put back into the
exact same place. Many are too short, so have undersized cotter
pins and no washer. I'm not happy with that configuration, so
will order new pins. That, of course, means that I'll be
loosening all the flying wires and landing wires to replace the clevis
pins at the end of the wires, so I'll have to undo the rigging, then
rig it again.

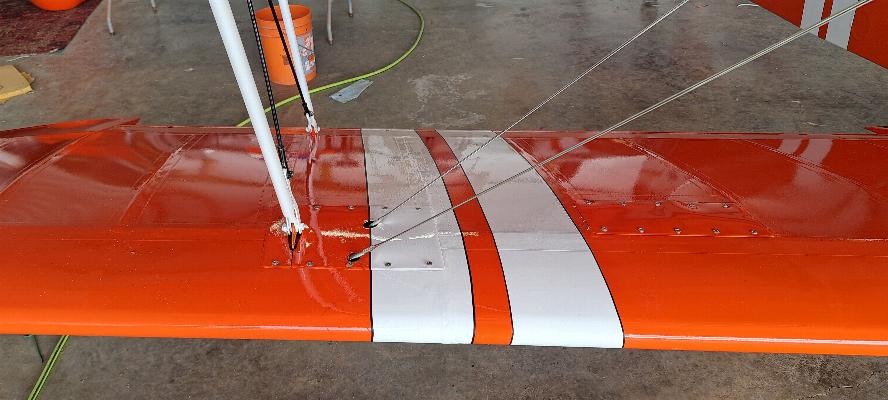
6/26/2025 - We're installing the tail surfaces today. First off
was to put the horizontal stabilizers on and rig them. Why do I
have this picture of the clevis and pin below? I thought it was a
bit of a sloppy fit. Shen I check it, it had been assembled with
a 3/16 clevis and pin into a 1/4" hole. Yeah. Just a bit
sloppy. I drilled and reamed the clevis fork out to 1/4" and
installed with a 1/4" pin. Both sides were done this way.


Once the horizontal stabilizers were on and rigged, I installed the rudder. 
The rudder was followed by the elevators with trim tabs. This
plane didn't have any trim tabs before. Just a spring to bias the
trim nose down and it was completely inadequate. There were three
hinges already welded to the trailing edge of the elevators. I
don't know if they were intended or used for trim tabs at some
point in time, or antiservo tabs or what. I did find an abandoned
cable that was likely for trim inside the fuselage when I removed the
fabric. I decided to take advantage of the hinge mounts on both
elevators and added a trim tab to either side with Ray Allen trim
servos set up to operate in sync with each other. They are likely
way overkill for this plane, but at the very least, it will finally
have adequate trim. With the addition of an aft auxilary fuel
tank, it may very well need more of this trim. The trim servos
are now wired in and working properly now.

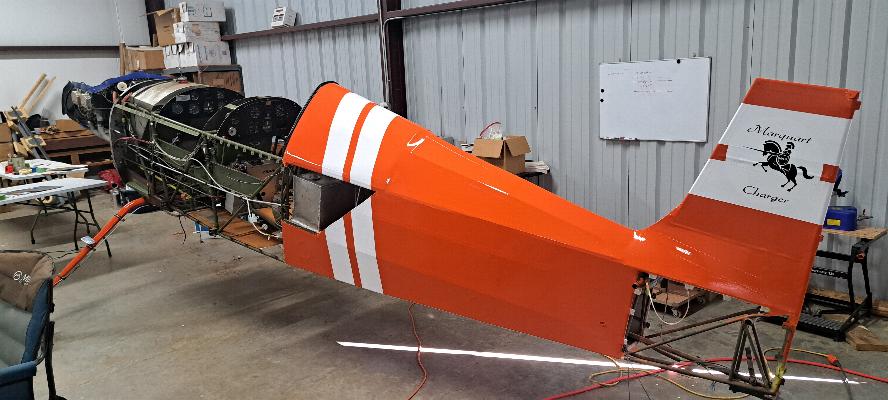
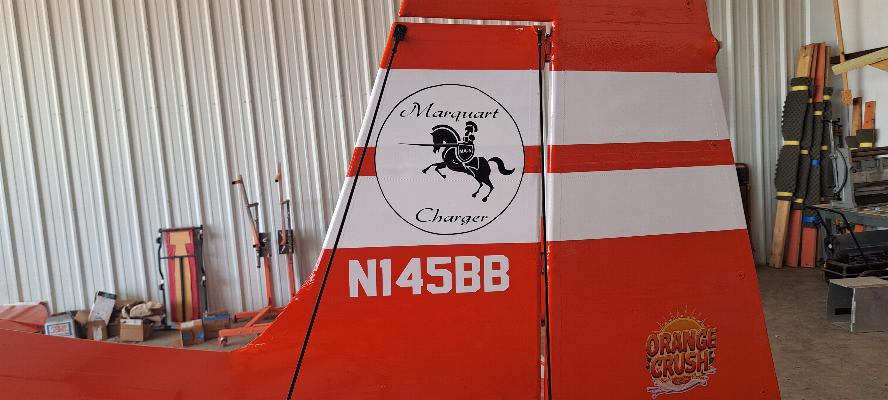
I also added the registration numbers to the tail and an Orange Crush
logo on the rudder. Now that all the big stuff
is on the plane, so from here on it is a lot of tedius work. I
have what seems like hundreds of little fairings that need to be
cleaned, prepped and repainted. The aluminum side and belly skins
will need to be degreased, prepped and painted. And I need to
design and build new wing root fairings that go between the belly skins
and the lower wings. The existing ones are a terrible fit.
I need to re-install the nav lights and strobes, hook up wiring
and pitot/static lines, fabricate and install little leather rub pads
everywhere I have crossing flying or brace wires that can rub on each
other. Just lots of little tedious tasks to complete.
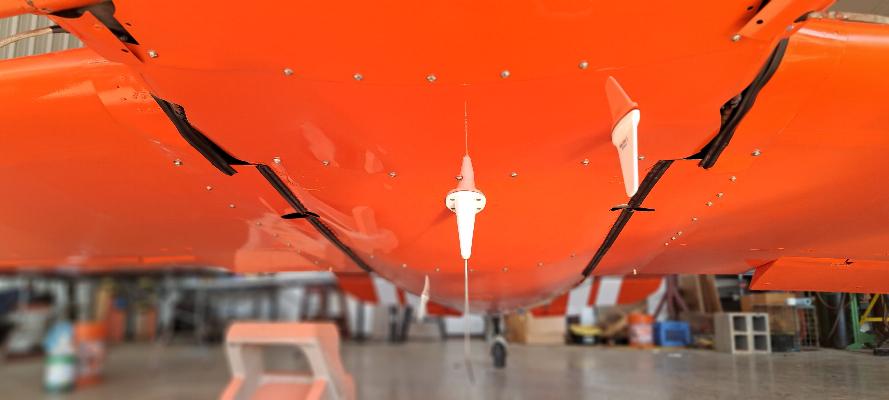
6/27/2025 - It's a day full of tedious tasks. The photo of the
nav light above is to remind me that I completed the wiring for the nav
lights and strobes and installed them on the wing tips. While I
had the plane apart, I also installed a sync wire that syncronizes the
tripple flash LED strobes so they will flash together now. I also
installed the pitot tube on the left wing outboard strut and hooked up
the pitot system. I didn't take a picture, but fabricated and
installed tiny leather pads that go between every set of brace wires
that cross such as the ones between the struts at the end of the wings
and the ones in the center section. Below, everything in this
photo that is either orange or white (5 tables full of parts!) still
needs to be degreased, prepped and painted. I degreased the worst
offenders this afternoon. That was all the skins from the belly
of the plane, which is always oily both inside and out. I still
need to design and build 4 fairings to replace the ill fitting fairings
between the belly and the lower wings. But once those fairings
are built and all this stuff is painted, all that's left is a few days
of assembly work. Still a lot of work left to do, but I'm on the
home stretch now and find it difficult to tear myself away in the
evenings to go home.

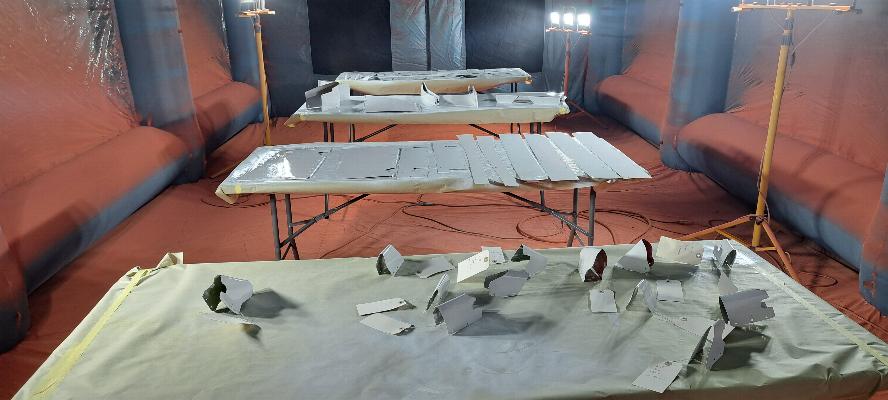
6/28/2025 - 4 tables full of fairings that I scrubbed down today, then
shot with primer. A couple will require some cleanup and
repriming, but most look pretty good and are ready for a light scuffing
and paint. I still have a bunch of larger panels that need to be
prepped and painted as well.
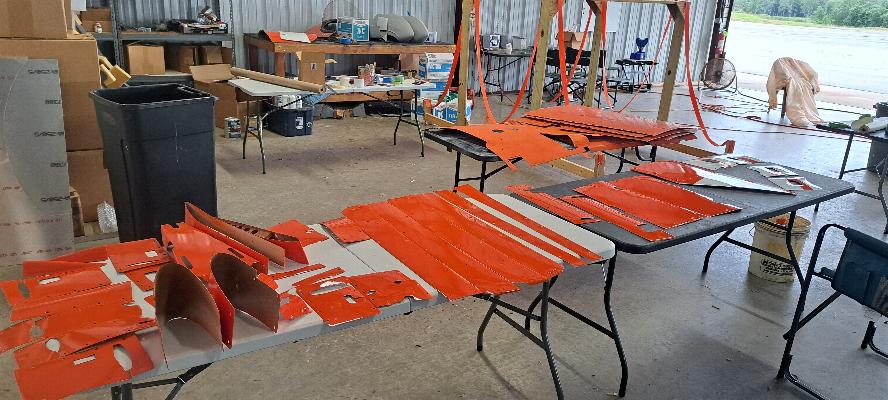
6/30/2025 - Two tables full of completed fairings, and another dozen
top, side, and belly panels all scuffed and ready to paint tomorrow.
That looks like more fairings than I would have thought one could
put on this plane. As Billy Mays used to say, "But Wait!
There's More!!!" See below. I've got to say, I really
like this paint from AirTech. It's easy to shoot and incredibly
glossy. The covering process beats the others I've worked with
hands down. I have covered with Stewarts, Polyfiber, and
traditional Nitrate/Butyrate dope processes. None of them compare
to the ease of working with AirTech.

Yes, there are 4 more fairings on the near table (in white primer) and
the third table back has 12 more fairings (finish painted in insignia
white) that all fit at the top and bottom of the center section and
outboard cabane struts laying on the third table back. These 4
fairings plus the dozen panels from the photo above all get shot orange
tomorrow. I still need to fabricate a new rudder trim tab and
paint it, and the venturi for the T&B gyro needs to be painted
black and that should wrap up all the paint work this week. Next
week is going to be final assembly, perform a new W&B, and get it
ready to fly. We're on the home stretch now!!! 

7/1/2025 - What is significant about this pile of parts I just turned
Orange? These should be the last parts to get painted. Yes,
after a 2 month marathon in the paint booth, I think I'm done with the
paint.

A friend suggested black pinstriping would make a really good accent
between the orange and white. Becky also suggested the same.
So, I ordered some 1/8" black pinstriping vinyl. It does
look really sharp, so now I guess I'll be doing all the edges of the
white trim with pinstriping now.
7/2/2025 - I put a bit more pinstriping on. The photo below is
the final product for the vertical fin and rudder. I have the
plane about half done, but ran out of vinyl pinstriping. More is
on order.

Some wingfairing are on now. I couldn't install the right side fairings since I ran out of pinstriping..
The door over the Aux fuel tank is installed. This used to be the
baggage access door. I put the Aux tank in there and moved the
baggage compartment into the turtle deck.

I only thought I was done with paint. I remembered last night
that I hadn't painted the spinner yet. It was still in white
primer. I mixed up a very small batch of paint this morning and
shot the spinner. I got the recipe off just a bit on the paint
and had runs all over the spinner. I waited for it to set up this
afternoon, then sanded it back down and shot it again. Good
results this time. Additionally, the two fairings behind the
spinner had been painted all orange. They should have been half
white, so they got masked and shot at the same time as I was finishing
the spinner. Hopefully I can empty ot the paint booth and deflate
it tomorrow.
7/3/2025 - Reassembled the tail fairings. Still have one fairing
to go on the tail. Also installed the top deck and side panels.
They aren't complete, but are partially fastened. I still need to
mount the belly pans and the cowling.
7/7/2025 - Made a quick trip to Oshkosh and back this weekend in the
RV, then took a day to rest. The black pinstriping arrived today
so I was able to finish the pinstriping on the plane. I love the
way it looks. Sure hope this stuff holds on.

I also finished the pinstriping on the tail and put on my other Orange
Crush Logo. I like it a lot better than the one on the other
side, so I peeled the other one off. Note that the last of the
tail fairings are now installed (fairing between the horizontal
stabilizer and the fuselage).. Also note that the rudder trim tab
is installed now. I started to install belly skins, but am stuck
waiting for two simple standoffs. UPS lost the order from
McMaster Carr. Should have been here last Thursday. Still
not here. McMaster Carr shipped the parts again, but they won't
be here until Wednesday. I still have plenty to keep me busy as
there are still a ton of fairings to be installed on all the struts.
It seems that every panel has problems with installation. I
inevitably have to install them 3 or 4 times as a nut plate will break,
or the nut plates will all need to have a tap run through them, or the
panels just won't line up. But it seems that every little panel
is taking an hour to repair and install when these things should just
pop right into place.
7/8/2025 - Today was a day full of little tedious tasks. All the
filler panels and fairings are installed at the top and bottom of the
cabane struts on the center section. Both filler panels and strut
fairings are completed on the wing struts and cross braces as well.
Upper wing attach fairings are all installed now. All of
those fairings and filler panels had been mounte with T-nuts into the
wooden structure, then glued in place. It seemed like every panel
would have one T nut fall off, requiring that I remove the panel and
often times an overlapping panel and insert a rivnut to replace it.
Lots and lots of tedious time spent cleaning threads and
replacing nut plates. But, they are all done now. The
engineis now filled with oil and ready to start. The cowling is
installed and the prop and spinner installed. I'm still waiting
for two little standoffs I need to install the belly pans. They
were in Little Rock on July 2, now UPS is reporting them as being
somewhere in California. McMaster Carr sent me replacements
yesterday, but they won't be here until tomorrow. I still have a
few more tasks to finish, but the work list is getting really short.
I'm guessing the plane should be ready to fire up late this week,
then if all is well with the engine, I'll insure it again next week and
will get to put it back in the air.
 It
It
It's difficult to see in these photos with the reduced resolution, but
I also added white pinstriping along the edge of the black chevron
that's on top of the center section. I still need to polish out
and ceramic coat the front deck and cowling, then will install the
front windscreen.
7/9/2025 - At last, the two standoffs I have been waiting for have
finally arrived allowing me to install the belly pans on the plane.
Note the shine of the Air Tech Paint! I also
installed the wing root fairings on the lower wings. I still need
to install the fairings where the landing gear exits the fuselage, and
plumb in the static air pressure system, and that will complete the
assembly. I'll do a new W&B late this week, then a thorough post assembly inspection and the plane will
be ready to fly. Since I designed and built a completely new trim
system for pitch control, I'll be putting the plane back into Phase 1 testing
for 5 hours before I can take any passengers for flights or leave the
area with it.

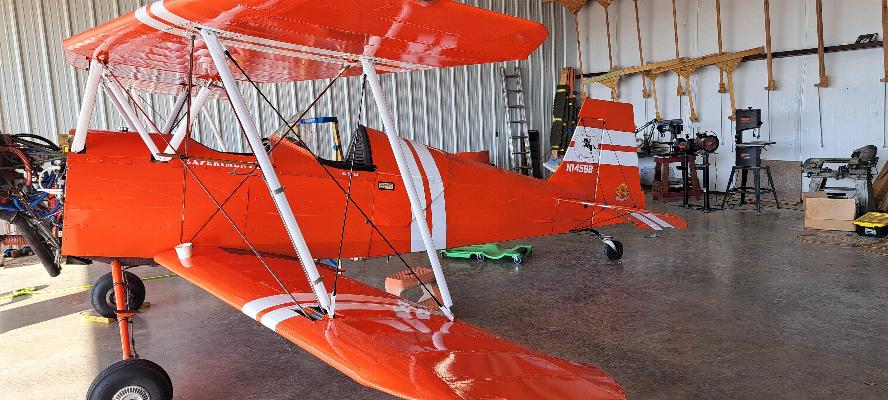
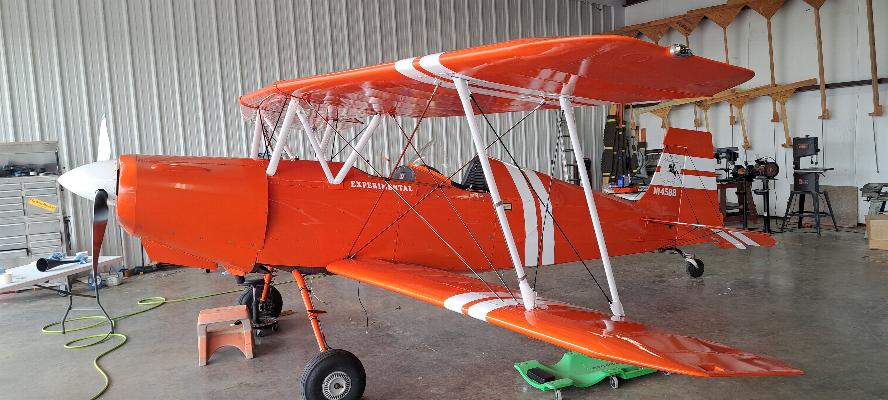
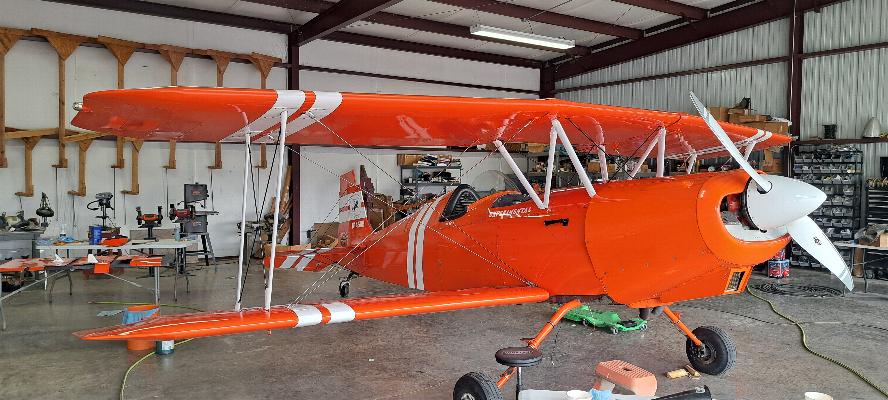
7/10/2025 - After 8 months of what seemed like grueling
work, it is done. I put in a couple of higher resolution photos
here so folks can see the shine of the AeroTech Paint. Wow!
I am, at best, a mediocre painter. But it came out great.
I enabled the insurance on it today, and will do a new W&B on
it tomorrow, then it will be time for a ground run on the engine, look
things over closely one more time, then it's time to fly and get the
break-in started on this engine.

7/11/2024 - I did the W&B on the plane today. Previously, the
plane had a very forward CG. After the rebuild, the plane lost
14# on the mains and gained 7# on the tail. That's almost
insignificant. With the new aft located Aux Fuel Tank full, the
plane still falls within the prescribed CG range, about 1/2 inch in
front of the aft limit. As I burn down the main tank, the CG
moves towards the aft limit, but since that fuel all gets transferred
to the main, it all moves forward and keep the plane within the limits.
I put the first run on the engine as well. I think I previously
explained a potential engine issue from the antique accessory case on
this engine where it may be prone to slobber excessive oil out the
breather, so I want to keep a close eye on that potential issue.
On the first attempt, the engine never fired. Well that was
disappointing. I also discovered that with the 10:1 compression
pistons, I don't get much run time on the starter before I run out of
power with the Odyssey AGM battery. I may need to upgrade to an
EarthX for more cranking power. Anyway, I discovered I had failed
to turn on the magnetos.  That is a stark reminder to me that I am out of touch with
operating this aircraft and I need to take off my mechanic hat and put
on my pilots helmet! I really need to sit down in the cockpit and
read through the checklists a few times until I have it all stored in
my head again. Anyway, I turned on the mags and gave the starter
one last try. I got one blade and the engine fired, but didn't
catch. Then I was out of battery. I put the battery on the
charger and went home to cool off. I returned late afternoon and
rolled it out again. This time with the mags turned on, the
engine fired right up. I ran it about 10 minutes and got the oil
temp up to about 160°F. The engine runs strong, but I also
found that I'm not getting any fire at all from the right magneto.
I'll dive into that problem in the morning. The mags are
"new to me" and were supposed to be low time. That should be easy
to sort out. Following the engine run, I saw no immediate issue
with it drooling oil overboard. I'll see if it dropped any oil on
the floor in the morning, but I would say the first indicator is that
it should be safe to test fly as soon as I get the magneto issue sorted
out.
That is a stark reminder to me that I am out of touch with
operating this aircraft and I need to take off my mechanic hat and put
on my pilots helmet! I really need to sit down in the cockpit and
read through the checklists a few times until I have it all stored in
my head again. Anyway, I turned on the mags and gave the starter
one last try. I got one blade and the engine fired, but didn't
catch. Then I was out of battery. I put the battery on the
charger and went home to cool off. I returned late afternoon and
rolled it out again. This time with the mags turned on, the
engine fired right up. I ran it about 10 minutes and got the oil
temp up to about 160°F. The engine runs strong, but I also
found that I'm not getting any fire at all from the right magneto.
I'll dive into that problem in the morning. The mags are
"new to me" and were supposed to be low time. That should be easy
to sort out. Following the engine run, I saw no immediate issue
with it drooling oil overboard. I'll see if it dropped any oil on
the floor in the morning, but I would say the first indicator is that
it should be safe to test fly as soon as I get the magneto issue sorted
out.
7/12/2025 - OK, It's an oil drip. About 1-1/2 inches aross.
So, it appears my engine is going to slobber a little bit of oil
out the breather Tube. I could put an oil separator on it, or I
can change the accessory case to the modern standard to fix it.
But this is not urgent, so I'll defer it to winter time when the
plane is idle for a while anyway.
The magneto issue is fixed. It turns out the mechanic, we'll call
him Jeff, had the P-lead and ground wires crossed on the right mag.
Easily fixed and runs perfectly now. Upon run-up, I
found that neither mag ran very smoothly as compared to running on
both, although the engine was quite smooth with both. When I
leaned the mixture a bit, both magnetos smoothed out.
Additionally, I found the engine actually drops abouty 100 rpm
from peak as I transition to full throttle. That drop coincides with the
ecomomizer valve opening in the carb, which also tells me the carb is
running a bit too rich. This carb is quite old and doesn't have
any of the numerous ADs or service bullitens complied with since about
1965, so I'll likely exchange it for an overhauled carb this winter.
The engine does run strong and everything is in the green, so
once I do a thorough preflight inspection, it will be ready to fly.
7/13/2025 - I got in the first test flight this morning. It was
very short due to weather concerns. I found a couple of minor
issues with the rigging. The left front landing wire has
excessive vibration in flight. That should require 1/2 turn
tightening on that wire to fix. I also found the plane flies with
the right wing a bit heavy. That is corrected by adjusting the
trailing edge of the lower wings, so I'll need to take some angle of
incidence measurements on both upper wings and lower wings, then decide
which lower wing I want to adjust. I either lower the trailing
edge of the right wing, or raise the trailing edge of the left wing to
correct his condition. Either adjustment will require adjusting
the aft strut and cross braces on the wing I'm adjusting. It
should only take about 1 turn on the strut, then adjust the braces as
necessary to taughten them. As expected, the two large trim tabs
on the elevator are very effective. The are effective to the
point of being a bit touchy in trim. I probably could have done
just fine with one trim tab or by making both of them significantly
smaller. But, what I've got will work quite well, so I don't have
any plans to change them.
Even though I am just starting on the break-in of the new cylinders,
the change in HP with the new cam, better magnetos, and 10:1
compression pistons is quite noticeable. WooHoo!
7/14/2025 - Continued testing today. 1/2 turn on the vibrating
landing wire fixed that issue. On the firt flight of the day,
just as I turned crosswind following take off, I heard a loud noise
that sounded much like a vibration. Also my EGT reading on the
new CGR-30 engien monitor didn't make any sense at all as they dropped
to almost nothing on a couple of cylinders, but were jumping up and
down. What the heck? It sounded like it had a broken
header. I made an immediate landing to investigate.
Ultimately, I found the left side exhaust header had fallen off
and the right side only had one nut left on #3 cylinder. Well,
it's quite obvious that I failed to tighten the exhaust flange nuts
when I re-installed the engine 6 months ago. No damage
done thanks to the immediate landing. I may have to fire the
mechanic. Maybe put him out to pasture in retirement!
I'm still working on the right wing rigging. I made an
adjustment, but found the plane still has a slight roll to the right.
I adjusted the right lower wing a second time. My level
says everything matches and the plane should fly very nicely now.
I'll hopefully confirm that in flight tomorrow. After flying, I
have not observed any oil dripping from the breather, so perhaps the
potential engine issue with the antique accessory case may not be an
issue at all.
No question the engine is making more HP. The ground adjustable
Sensenich prop is set to the same pitch pin as before, but turns 50 rpm
more static and will now exceed redline on the engine in level flight.
It wasn't capable of that previously. The 10:1 pistons make
the engine turn over very hard on the starter. Don't know if I
would put them in again. The manufacturer, "Combustion
Technologies" has ceased operations, so those pistons are no longer
available.
7/15/2025 - No flying today. Low ceilings all morning, then windy
this afternoon with scattered low clouds. It did get decent late
afternoon, but by then I was overheated from moving hangars, and passed
on the flying. Maybe I get in a test flight tomorrow. I
really want to check to see if I got the rigging right this time.
Really want to be done with the rigging as that is the last
squawk at this time.
7/16/2025 - I made several flights today while adjusting the wing
rigging. I overshot with the previous attempt at the rigging and
changed it to a heavy left wing. I made incremental adjustments
over the course of 5 or 6 flights today until I got it to where I was
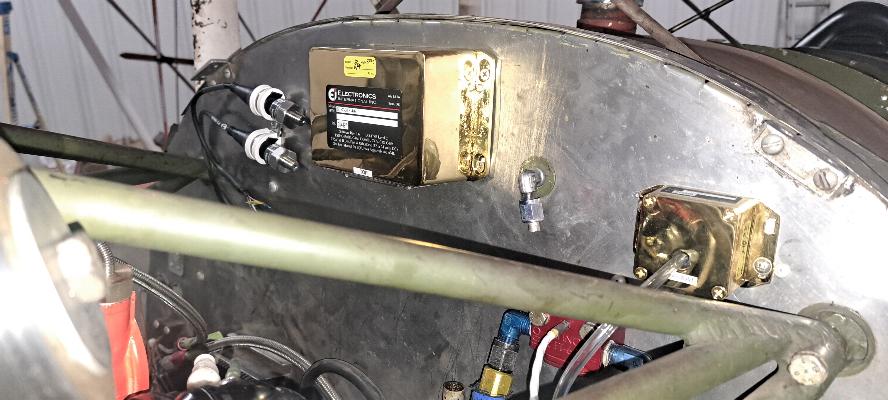
happy with it. But, on the last flight, my Electronics
International engine instrumentation went crazy. I made a serious
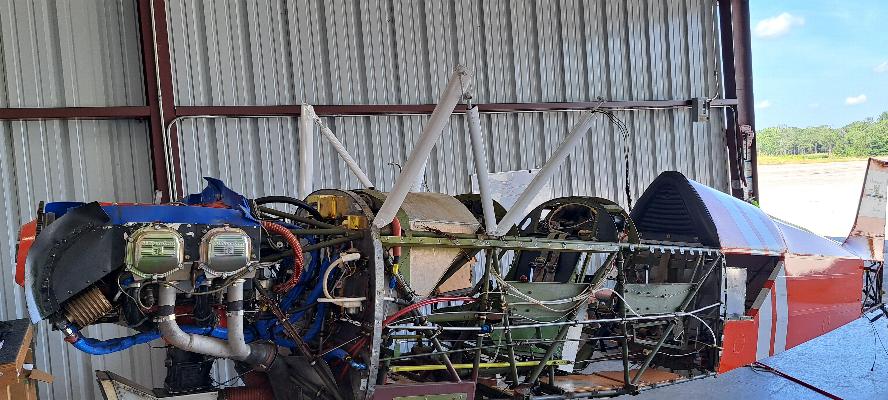
error when I installed it. The Unit that converts all the analog
engine data to serial digital data (EI EDC [Electronics International
Engine Data Converter]) is mounted on the top of the front side of
the firewall (the big gold box in the photo below). EI
specifically says not to put it in front of the firewall, so it is
clearly my mistake. In this plane, there just isn't anyplace else
to mount this thing unless I put it behind the back seat. This is
a problem as it gets exposed to a lot of heat in that location.
On the last flight today, it got too hot and the data on my
display went crazy. It looks like the best solution is going to
be to build a box over the unit and supply fresh air to the box to keep
it cool. So, tonight I'll be drawing up a box to build for this.
When I ordered this unit, I consulted with EI about ordering it
with longer leads so I could install the EDC aft in the plane. I
told them there was no place for it in the front cockpit, and they
recommended I mount it up front. Thinking back, I'm sure I
misunderstood them to say I could mount it in front of the firewall.
That is clearly not acceptable according to the installation
instructions, so I likely just misunderstood them hearing what I wanted
to hear.

7/17/2025 - I fabricated a box out of .015 2024T3 to cover the EI EDC.
I'll duct air into the top of the box and the bottom is open to
allow the cooling air to escape. I'm grounded for now while I
wait for a couple of bulkhead fittings and some 3/4" scat so I can duct
some cooling air to the EDC. This will also give me an
opportunity to improve the cooling air going to the magnetos as well.
After I landed, I checked the mags with my IR themometer and
found they were over 150° F. That's hotter than I would like
to see. Currently, there are a couple of holes in the baffling
intended to allow air to leak to the mags. I suspect they are
leaks, but not likely doing much for the mags. I'll fix those
with some blast tube ducting as well while I'm working on it. I
also need to have a new pitch pin machined for the Sensenich ground
adjustable prop. The previous setting I was using is simply too
fine for the new version of the engine with 10:1 pistons and a cam that
has all the lobes. The pitch pins that came with the prop were
all too coarse, so I had one machined down to what I needed at the
time. Now I need another pitch pin that is a bit more coarse, but
not as much as the others in the kit. That will keep the engine
from over revving.

7/22/2024 - The 3/4 inch scat hose is now installed to supply cool air
to the Electronics International - Engine Data Converter (EDC) that I
suspect was overheating due to my installation in front of the firewall
(contrary to their installation instructions). I added a 3/4 inch
bulkhead fitting into the rear baffle and ducted it to another 3/4 inch
fitting I put into the box I built to protect the EDC. It should
always have a supply of ambient temperature air supplied to it now,
although there is sure to be some heat exposure after engine shutdown.
I also closed off a 1-1/2" hole in either side of the baffling
undoubtedly intended to provide air to the magnetos, and reduced them
to 3/4 inch with a hose directed at the magneto for more efficient
cooling of the magneto and less air wasted through leaks in the
baffling. I'll test this later this week. For now, I'm
still waiting to get a new pitch pin machined to set the prop where it
needs to be to load down the new engine a bit more to prevent
over-revving. I also worked on my helmet a bit today as it seems
to be pinching my ear, making it uncomfortable to wear. Hopefully
that was just an ear piece that had been twisted a bit out of place.
Or, perhaps my ear moved over the last 8 months?
I hope to complete the testing and evaluation of the changes to the
plane in the next week or two, then will put it back into Phase 2.
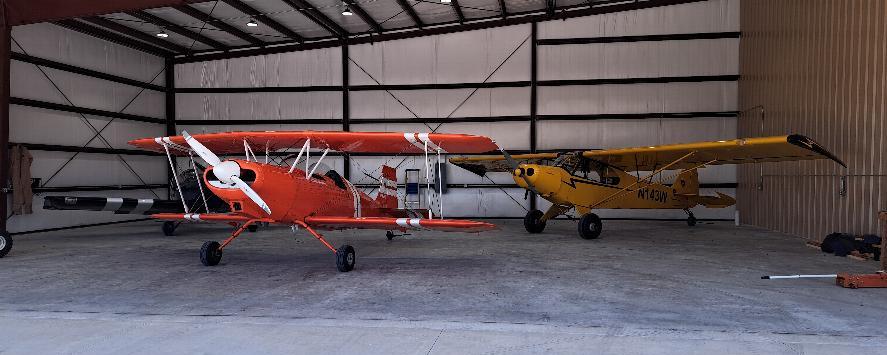
7/24/2025 - Photo of the Charger in its new digs with its stablemates.
I leased this 65x55' hangar along with a corporate size T hangar
across the alleyway from it. I'm moving the shop and all my
storage down here. The shop will be in the back of the big hangar
and the storage will be in the T hangar. There will still be
sufficient free space to put any of the planes in the T hangar if
necessary. Now I have sufficient space to take in another
project if the notions strikes.
I had one of my too coarse pitch pins for the Sensenich ground
adjustable prop turned down to make one more intermediate pitch.
The latest pin is .035 larger diameter than the previous setting.
I don't have the ability to interpret that to an actual pitch
setting. I could borrow a protractor and take a measurement if I
thought it was pertinent. This one seems to be just right for the
much stronger engine. It turns 2550 on climb out and will turn up
to 2650 in straight and level flight. It will likely bump up into
the red on occasion during aerobatics, without running way past
redline. in my mind, that is an ideal configuration for a fixed
pitch prop. The plane indicates roughly 8 kts faster than it was
before the rebuild. I added an antiglare film over top of the EI
CGR-30 engine monitor. I can read it much easier now. I had
one intermittent EGT that appeared to be a connection that wasn't quite
tight. That is also cured now. On the first flight, I noted
the plane still had a slight left wing heavy condition. I landed
and loosened the right rear flying wire 1/2 turn. That made
it perfect. So, now the rigging is all completed and the engine
is running great. With the cooling air supplied to the EI-EDC
box, it seemed to behave properly on the second flight after everything
was heat soaked. On climb out the hottest CHT topped out right at
400°. That is satisfactory. At cruise the hottest CHT
drops back to 350°. Those numbers are perfect. Oil temp
stayed at 185° for most of the flight, although a long climb once
it was heat soaked brought it up to 195°. The only anomoly I
noted was that the oil pressure is running a bit high. 95 psi
before it's up to temp and 85 psi after the engine is hot. It ran
high before I overhauled the engine and I didn't change it when I put
the engine back together. I should remove a couple of washers
from the oil pressure regulator to bring the pressure down just a bit.
The only thing I am struggling with yet is the ergonomics of my helmet.
I tried some new ear plugs designed for motorcycle riders.
They work well for getting rid of the wind noise, but also made
it impossible to hear the radio through the helmet. But, the
design gave me some ideas to try with the CEP adapers I have for the
helmets. I have been using the same foam earplug adapters I use
on my Clarity Aloft Headsets in my other planes. The problem is
that under the helmet, the cloth cover on the ear cups pushes on the
ear piece that goes into the foam adapter causing the foam adapter to
pinch and close off the audio hole through the plug. What I end
up with is no audio in either one ear or both ears. I started
flying without the CEP adapters, but the noise level is quite high,
which is a problem for hearing damage, but also makes it very difficult
to understand radio or intercom communications. I may try using a
modified version of the ribbed silicone ear plug adapters and see
if that won't work a bit better.
7/25/2025 - Continuation of phase 1 testing. I di dthe slow
flight and stall series today. Simple enough in a biplane since
there are no flaps or any way to odify the wings in flight. Power
off stall is at 61 mph IAS with a mild buffet before stalling.
Recovery is effortless. I was going to start some routine
aerobatics, while I finish flying off the 5 hours this morning, but ran
into an issue with fuel pressure. I noted on the CGR-30 (that I
can finally see thanks to the ant-glare film I added) that the fuel
pressure was running below 1 psi. I turned on the electric pump and it
went up to about 1-1/2 psi, but was degrading as the pressure kept
edging lower and lower. When I shut off the electric pump the
pressure would go to 0, so I assume I was not feeding enough fuel to
keep the engine running, but wasn't going to let it run out, so cycled
the electric pump back on. The pressure continued degrading down
to .6 psi as I returned to the airport. As I throttled back, the
pressure came up to 1.5 psi, then was normal once I was back on the
ground with just the mechanical pump. This all points to some
construction debris, probably from the new rear tankconstruction
plugging up either the screen in the gascolator or the carb inlet
filter. I'll pull them off for a good cleaning before it flies
again. Stuff like this is exactly why I do phase 1 testing
following a rebuild of the airframe! Other than the fuel pressure
issue today, I am thrilled with the end product from rebuilding this
plane.
A word on the CEP adapters under my helmet. This morning I took
my scissors and cut the end off the CEP ear plugs. Now they are
short enough that they don't pinch and shut off the sound. Radio
communications were clear for the first time ever in the plane!
Score another win!!!

7/26/2025 - This morning I disassembled the gascolator and the carb
inlet filter. Both were clean with no debris found.
Since there are no restrictions in the fuel system, the
answer to my fuel pressure issue has to be that it is trying to vapor
lock. Previously, there were two big holes (roughly 1-1/2") in
the back of the baffling. I assumed they were there to help cool
the magnetos, but there were no blast tubes to the magnetos, so that's
a pretty inefficient way to cool them. So, I closed off those big
holes, and added 3/4" blast tubes directed at the base of the magnetos
where they need the cooling air. It would appear that those holes
also allowed some fresh air to get to the electric fuel pump and
gascolator. As can be seen in the photo above, the electric pump
and gascolator are mouned right in the air exit at the bottom of the
firewall. That is asking to boil the fuel, and now, that is
exactly what is happening. This mornings flight started with a
crisp climb with the fuel pressure indication the normal 4 psi.
(green is .5 - 7 psi fuel pressure) I climbed up to 6000'.
The longer I climbed, the more the fuel pressure degraded.
Despite the hot day, at 6000', it was quite cool. I
throttled back to reduce the fuel flow demand to see what effect that
would have on the fuel pressure. It had no effect at all.
By that point in time, if I shut off the electric pump, the fuel
pressure would go to zero, although the engine never stumbled.
With the pump on, it was going in and out of alarm with an
average pressure of around .3 psi. I cruised around for a bit
waiting to see if it would recover in the cool air and low power
setting. It did not. Then I trimmed a bit nose down to
start descending back into the hot air below. As soon as I picked
up a bit of speed, pushing more air through the cowling with the same
throttle setting, the fuel pressue started climbing. By the the
time I was back in the pattern to land, the fuel pressure had returned
to normal with the electric boost pump either on or off. Not much
question in my mind that the fuel is boiling in the gascolator and/or
electric fuel pump. I need to build a box to protect them and
will add another 3/4" hose from the back of the baffling to supply the
box protecting the gascolator and electric pump with cool air.
One last problem to resolve. I'm showing 4.1 hours on the
tach, and I'm down to the last problem. The scat hose won't be
here until sometime next week, so I'll finish the flight testing then.
In the mean time, I need to design and build another box.
8/6/2025 - I have been remiss in taking photos. I'll make it a
point to take some photos next time I open the cowl to show what I have
done, so will edit this post then. But, the story is that adding
cooling air to the gascolator and fuel pump appears to have addressed
the fuel pressure issue. The pressure stays in the green and the
engine is happy. However, that just led me to the next issue.
I found that I was getting erratic oil temperature readings.
The oil temp would be 175, then jump up to 255, then back down to
185, and was running up and down quite a bit triggering overtemp alarms
on the engine monitor. As soon as I landed, the oil temp would
stabilize. This sure acted like a loose wire to the Oil Temp
transducer to me. Not sure if it uses a thermocouple of
Themister, but it really doesn't matter. I checked to make sure
the set screws were properly set on the connectors, and they were.
I took it for a test flight and found the problem was actually
worse. That indicates that moving the wiring around exacerbated
the issue, so it almost had to be an intermittent crimp terminating the
wire. I removed the connectors and recrimped the wire end
terminators, then reassembled. That *appears* to have settled the
issue.
I also completed the 5 hour phase 1 flight time today, coinciding with
me ringing out the last of the teething pains with the plane. I
just had to roll it upside down. Wow! Pretty cool.
All at 1 G. Then I discovered I had left the shipping lock
set on the replacement G meter.

8/9/2025 - The box I built over the gascolator and electric fuel pump
is shown at the bottom with a piece of scat running from the upper
right rear baffle.
I flew the plane to the EAA Meeting in Missouri this afternoon.
What I found is that my fuel pressure still drops occasionally
into the red when things get hot enough. I also found that when I
would lean out the mixture for normal cruise (with the hottest EGT at
1500°), the CHTs would go up 30°, the oil temp would go up 15 -
20°, then the fuel pressure would fade to nearly nothing and keep
dipping into the red and triggering alarms on the engine monitor.
If I richen up the mixture enough to drop the EGTs from 1500 to
1350, the CHTs would drop back down, the oil temp would cool, and the
fuel pressure would come back up and stabilize in the green. The
concatonation of those symptoms is telling me that with the 10:1
compression pistons and the stock 25° BTDC timing, I am pushing the
detonation margin just a bit too much and I think the engine is just
bordering on detonation. I'll try backing off the timing about
3 degrees next time I have the cowling off. I'll bet that
will make a positive impact on the temps.
Oh yes. After releasing the shipping lock on the G meter, it now registers correctly too.

One last set of photos. Last week I completed moving my shop
to a new hangar. So, now I have almost everything in this 55 x 65
hangar. The shop is the back 10 feet of this hangar.

I also have this T-hangar that faces the large hangar with the shop.
I can put the biplane over here. Then I don't have to shuffle
planes to get one out. I also have a lot of my seldom used tools
and parts stored over here.
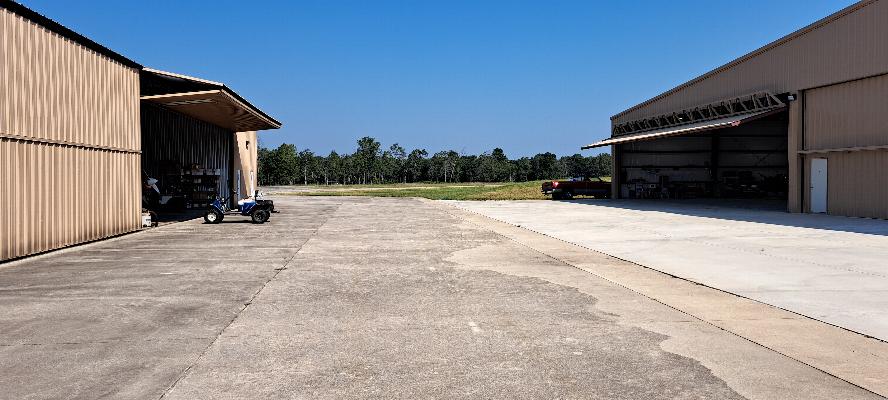
The two hangars face each other across the hangar access alleyway. It's a really nice setup for me.
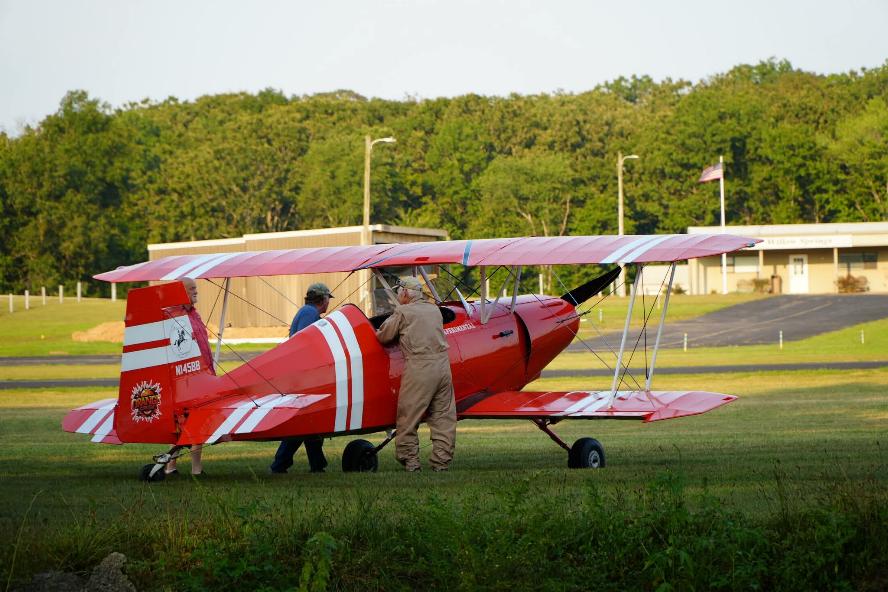
8/9/2025 -Series of photos taken by Kent Nichols on it's first official
outing to Willow Springs MO EAA Meeting following completion of the
Phase 1 Flight Testing.