The Marquart Charger
This story started about a year ago. I saw this Marquart Charger
listed for sale, but wasn't ready to buy yet another airplane.
But it had really piqued my interest for a number of reasons and
I was really interested. But it sold, and I figured that was the
end of it. Then it appeared for sale again this winter at a very
high price. I didn't figure it would sell. Later it was
listed again for a lower price. I thought it was still unsalable
at that price, but contacted the seller and asked him to get back to me
if he wasn't able to sell it. A month later, it's listed again at
a lower price again. Now I'm interested, so contacted the seller
and went to look at the plane. My initial analysis was that this
is a well built plane with a good engine, but the 40 year old fabric is
in really tough shape with lots of ringworm, and chipped and peeling
dope. It could be kept airworthy for years, but to fix the finish
will really require a recover. We negotiated a final price, and I
bought it pending delivery at my hangar. Two weeks later on March
18, 2022, the owner delivered it to me, we exchanged funds and
paperwork and I took him to Little Rock to catch a flight home.
So, now I've bought myself a plane that I not only haven't flown,
but haven't even started. Hey, but it flew in, doesn't leak oil,
and from my mechanic's eye, looks to be a well built airframe with a
sound engine with no leaks. So, it's time to tear into it and
find out what I really have.
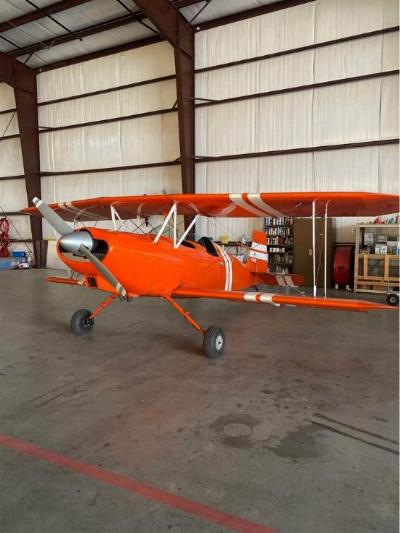
So here is what I found in the hangar in Altus, OK. Beautiful to my eye.

Engine pulls through showing good compression on all 4 cylinders.
The engine compartment is clean and oil free. This engine
is clearly not a leaker. A log book review shows good engine
time, and good maintenance over the last 40 years. Physical
inspection shows a good, well built airframe in good overall condition
with one exception. The dope on the fabric is 40 years old and
shows it. It's getting to be in pretty tough shape. I could
keep it airworthy for years with patching and touch up, but I'm leaning
towards a winter recover project, maybe next year.

Front Cockpit. Note the tachometer on the right has a broken face
and the needle stuck all the way to the right. Actually, a pretty
well equipped front cockpit.

Rear Cockpit with additional instruments, radio and transponder down between my knees.

MicroAir Radio and Transponder. Clock, dual CHTs, Manifold
Pressure and Ammeter. Funny that it has a wind up 8 day clock in
both cockpits... neither of which actually work. The MicroAir
radio has a transmitter problem, so has been removed and shipped to
MicroAir USA for repair.


Only a few examples of the fabric issues.

March 19, 2022 - It's finally here in my hangar. In my opinion, a pretty sharp looking plane!
And so it begins...

March 21, 2022 - Getting things opened up for inspection.

Trying to get the numbers from the broken tach in the front seat.
I took a photo of it in my inspection mirror, then edited the
photo for a reverse image to make it readable. New tach is on its way from Westach.

The MicroAir radio needed to be removed. This mounting box was
not designed to be taken apart. Turns out, the radio drops out
the bottom of the box and you have to remove the belly pan from the
plane to get the radio out through the belly of the plane. It's on its way to MicroAirUSA for repairs.

Looking up through the belly and through the radio mount from the bottom side.

Things look pretty good down here. This plane has sure got some brutally beefy tubing!

I didn't like the old style antenna that gets mounted into a hole
(on the left). I had a Rami flange mount antenna with BNC connector left over from
testing on the Cub, so it went on here. I didn't like the coax that was installed either, so installed new for the radio.

Left side of the cockpit removed. That red handle is the trim
control, which is a spring that adjusts to bias the elevator nose up
when necessary for landing.
June 8, 2022 update, Actually that trim handle will give me some nose
down trim in flight, but doesn't trim nose up. I can't find any
need for nose down trim as the plane flies straight and level with no
trim input. I'll likely modify the trim system at some time in
the future.

Right side of the cockpit. The round white thing in the middle is
a piece of PVC protecting a cigarette lighter plug for DC power access.
I'll probably replace it with a dual USB outlet, then will add a
second dual USB port, so will have USB power available for the Stratux
receiver, a phone/tablet GPS, and to keep my phone charged.

A friend called this plane "Orange Crush". I liked that idea, so added the Logo. Thanks Dane!

The side panels had a bunch of rivnuts in them. That explains the
missing and loose screws I found. Many of them are slipping and
turning, which seems to be what rivnuts do best.
(Have I mentioned I detest rivnuts as they always fail!) So
I spent part of the afternoon drilling out rivnuts and riveting in #10
nut plates.

This is my test case for paint. This panel was on the belly and
was unpainted. I found some Krylon paint at Walmart that looked
like it might be a close match. As one can see from the photo,
there is a little more red in the original paint. I strongly
suspect based on the vintage that the original paint is GM's flame
orange. I had a '72 Olds Cutlass in that color (45 years ago),
and in my mind, it looks like a match. I'll have to go visit O'Reily's in the morning and see what they have for paints.

March 24, 2022 - Here's the challenge of the day. I removed the
panel from the side of the plane, but there isn't any panel covering the
bottom of the tail. That's not OK. So, today's challenge is to
fabricate a new panel to cover the bottom.

I cut up a Pepsi carton, folded, trimmed and cut until it resembled the piece I need.

Draw it out onto Aluminum.

Sheer and cut the alumiminum to fit. I used a unibit to make the radiused corners, then cut between the holes.

The sheet metal brake and press brake come in handy bending the piece to fit.
The hook on the front of the part hooks over a welded tube where
it fits in to hold the front of the part up into place.

The part was test fitted, then drilled and cleco'd into place.
These cables hanging down are for the tailwheel steering.
The holes where the clecos are holding it in got drilled out
larger for screws, then nut plates rivited onto the new piece so the
outer panel can be screwed to the bottom panel and that will hold it up
into place.

The part was acid etched to prep for paint, then shot white with
primer. For some reason, I didn't get a picture of it after I
painted it orange, but will add that photo tomorrow.

March 25, 2022 - Painted the part to match the plane,and ready to
install. I found a better matching shade of orange at the local
hardware store for touchup work. Of course I'll use a high
quality paint when the plane gets recovered/repainted. But for
now, the rattle cans will do for temporary touch up work.

And installed.

I replaced the cigarette lighter with a dual USB port in the right side
switch console.

Then I also added another dual USB port on top of the baggage
compartment and installed my Stratux ADS-B receiver in there. The
thin slot where this is fitted is just between the top of the pilot's
seat back and the bottom of the headrest. Now I have plenty of power available for the
Stratux, GPS, phone charger, etc.

I also added a retired Sumsung Galaxy 7 phone to be used as my GPS.
One note on using a phone or tablet. If you don't have
contracted service for the phone, the internal GPS is disabled.
That's OK as I it connects via WiFi to the Stratux and uses the
GPS in the Stratus. That was OK right up until the Stratux quit
working, then I was without a GPS. I do carry my phone in my
pocket, so can always dig it out to use.

March 26, 2022 - Today I added anti-submarine straps to the cockpit
restraints. That's not submarine warfare. It's the crotch
strap that keeps you from submarining out of the lap belt in an
accident sequence. Front cockpit shown here.

Rear Cockpit.

March 28, 2022 - I replaced the broken Tachometer. It appears it
was also wired incorrectly when I rung out the wiring.
Update: the new tach was reading roughly 1/2 speed. I sent it
back to Westach and they added a jumper to bring it up to speed.
However, I have a 200 rpm differential between it and the cable
driven tach in the back seat. I need to do a calibration check to
see which one is correct.

When I tested the brakes on the plane while in OK, it seemed to me they
were very soft, so either were not functioning, or had very little
brake available. Today I drained the hydraulic fluid from the
brakes. There was very little fluid, and what was there was
contaminated with water. I pumped the brakes back up with fresh
Mil-5606 Hydraulic and they are now up and hard as I would have
expected them to be. The left brake bleeder was blocked solid.
I had to remove it and clean the internal ports with a drill bit to
clear it. I'm amazed the plane flew in with the brakes working so
poorly, if at all.
March 29, 2022 - I cleaned and gapped the plugs, timed the mags, and ran the
compressions. The engine checks out pretty good. 79/80,
73/80, 80/80, 77/80. The 73/80 cylinder is leaking just a
tiny bit through the exhaust valve. I'll keep an eye on it and
lap it in if I deem it necessary. But it would need to be quite
a bit worse before I would fool with it. The 77/80 cylinder is
leaking a bit past the rings, but that's not abnormal or anything that
even remotely concerns me. I did note the baffle seals are in
poor condition, so will replace them as well.
Update: While this engine doesn't leak, it seems to use quite a bit of
oil (1 qt to 4 hrs). Considering that it has around 500 hours
over 40 years, and you can see in the photo below that the exhaust
pipes are gray and not oily, I suspect sticky oil retention rings
rather than wear. I gave it a good dose of Marvels Mystery Oil in
the crankcase to help break down lead/carbon buildup in the rings.
Some marvels and more flight time should improve the oil
consumption.

March 30, 2020 - I repaired a broken tailpipe hanger bracket yesterday.
After looking at a high res photo last night, I noted the other
side of the same
bracket was cracked and one side of the other bracker was also cracked.
I repaired them all today and took a new photo. The piece
was made from .050"
4130. I sandwiched each of the repairs using 2 pieces of .040"
4130.

This belly panel was unpainted and had a bunch of damaged nut plates.
I cleaned and painted, then installed new nut plates. I
noted in the movie the plane was used in in 2008, the belly pan was
unpainted then as well.

I replaced the black cowl seal with the new blue seal. This had
to have been the original 40 year old material, and is in pretty bad shape.

Engine with all new cowl seals installed. Replacing failed
seals like this will typically lower CHTs 20° - 40°. The
engine needs a good wash down. I'll also be installing an oil
filter adapter shortly.

I replaced this 20 amp breaker with a 7.5 amp breaker. 20 amps is
a lot of amperage to operate a cigarette lighter outlet and a bit too
heavy for the wiring, which is what's really important.
I have two dual USB ports on this 7.5 amp breaker now to operate
the Stratux receiver, GPS, and to keep my phone charged if
necessary. This panel is located on the right side of the rear cockpit.

March 31, 2022 - This is the original configuration with an oil screen
and the steel braided lines to the oil cooler without firesleeve.
It's getting a spin on oil filter installed and firesleeve on the
oil lines.

Spin on oil filter adapter. I bought an angle mount Casper oil
filter, but realized that may be a problem as the oil filter would end
up very close to the top of the cowl. Getting the filter on and
off without removing the cowl would be a bit of an issue. A
friend is building a Panther using an O-235 that I used to own.
When I sold that engine, I sold it with the original Lycoming
straight mount oil filter that came off the O-320 in my Cub. Like the Cub, the engine on the Panther sits so
close to the firewall that the straight Lycoming oil filter is a problem, but
the Casper angled oil filter adapter will fit properly. So I gave him a
call and we swapped oil filter adapters. He got a brand new
Casper adapter, and I got my old straight mount filter adapter back.
I do need a
vernatherm to go into the filter adapter. The engine never had
one with the oil screen. I ordered a box of 4 vernatherms from
FletchAir on ebay. I bought the engine I overhauled for the Cub
from Fletch Air, so have been to their shop. They are good people
operating a Grumman salvage yard near San Antonio, so these
vernatherms likely came out of salvaged aircraft.

Blue firesleeve now encases the lines to the oil cooler.
I also changed the oil in the engine and checked the fine screen from
the back of the engine, and pulled the screen in the sump suction tube.
Neither had any debris or chips, so I think I can safely assume
there are no spauling or bearing issues with this engine.
Everything on this engine checks out good.
April 2, 2022 - I completed the airframe inspection today pulling the
panels over the wing and flying wire attach fittings and the aileron
controls in the wings. All that stuff is impressively overbuilt
on this plane. Once again, I found the nut plates were all done
with rivnuts. ARGH! I found some missing and damaged
rivnuts with missing screws, so replaced them by riveting in nut
plates. When I recover this plane I am going to be spending a
couple of days riveting in nutplates to replace all these rivnuts.

April 5, 2022 - The Engine build I'm working on is stuck waiting on
parts for a day or two, so today I was able to finish the the engine
and airframe inspection. The Vernatherm arrived yesterday, so I
installed it and safetywired the oil filter and fittings. The
gascolator was disassembled and cleaned. The cowl is back
together and closed up. The sides and belly pan are still off the
plane as they radio needs to be installed up through the belly of the
plane when it comes back. All that's left to do is re-install the
radio when it comes back, re-install the sides and belly pan. And
do a new W&B for the plane. Then it will be ready to fly.

April 29, 2022 - 5 weeks later, I finally got the MicroAir
radio back. Seems like it took forever, but that's just me being
antsy to get this plane in the air. According to the shop, the
radio was pretty well trashed and required a new board. Tomorrow
I can finally re-install the radio and put the belly back on the plane,
then will be ready to do a new W&B for the plane. Once
completed, the plane is ready to fly. I'm still waiting to get
either my new bonehead or used Gentex APH-6B
helmets. I currently have neither. I'll get the old helmets
next weekend in Iowa. The new helmets are still 2 weeks out if
they are still on schedule. The factory said 6 - 8 weeks and they
were ordered on March 11. Rick at MicroAir USA shipped the radio
back to me without billing me yet. Nice guy, and trusting.
When I opened the package, there was something rattling around
loose inside the radio. I decided to investigate. I
removed the outer shell and found a mounting/ground screw had fallen
out of one of the boards. I put the screw back in and put the
shell back on the radio. I'm glad I decided to take a look.
In the mean time while waiting for the radio, I built up an HO-360-C1A
for a friend's Bellanca Scout and have been working on some fabric
repair and touch up on the Charger. The engine is on the stand in the background in the second photo below.
April 30, 2022 - I went to the airport to install the radio and
reassemble the plane. It took a bit more time than anticipated. I
noted the radio had another rattle in it when I got to the airport, so
I removed the cover from the radio and shook it around a bit more until
two lock washers fell out. One clearly belonged to the screw that
I found yesterday, so I re-installed it. I couldn't find where
the other one went, so tossed it. I checked and found all the
mounting screws on the board that had been replaced were loose.
No harm, no foul. I just tightened them down and all is
good. The radio tests good and works, so that's my main concern.
Why is the belly pan still off? The radio has to be
installed up through the belly of the plane to access the aluminum box
down between the pilot's knees where the radio is installed.

Once the radio was installed, when I went to install the
belly pan, I noted deep grooves worn into the pan from rubbing against
the wing root fairings. In some places it was worn through and
was close to failing. So, I took the time to cut out some
doublers, then drilled and riveted the doublers down the length of the
belly pan on both sides.

Back side. Note the antenna doubler. That is a
new RAMI antenna I had in the hangar left over from trying various
antennae on the Cub 10 years ago. Previously it just had an old
threaded antenna that kept working loose and swinging around.
I failed to take any photos while doing the W&B, but the results
were good. She's a bit chubby at 1244# empty weight and the plane
is a bit nose heavy. With me as pilot, I need about 25# ballast
in the baggage to balance the plane under all conditions. I also
fueled the plane and found that it holds exactly 20 gallons of fuel.
Not very much to feed an O-360. When I recover the plane,
I'll likely add an 8 gallon center section tank into the top wing.
The wing root fairings were also in pretty rough condition for
mounting, so I spent a fair amount of this afternoon repairing mounting
holes and adding rubber antichafe trim to prevent the type of damage
shown in the two photos above. When I got home, I did the logs on
the plane, so as of tomorrow, the plane will be legal to fly and it is
in condition to fly. My only hold ups are that the weather here
has been lousy, and I still don't have either the new or old helmets
I've bought. I'll pick up the old helmets next weekend.
Hope they are in usable condition.

May 1, 2022 - I put a few finishing touches on the plane
replacing some screws and removing some masking. Then I rolled it
out for some glamour shots. Now all I need is my flight helmets and time
to go fly.


May 4, 2022 - Taxi testing. Things have not gone exactly as
expected. I took the plane out to taxi around on May 1.
Preflkighted the plane as if I were going to fly. No need
to drain the gascolator since I had had it apart to clean during the
annual. I climb in and turn on the master anda boost pump.
Hmm. No fuel pressure. I remember now, the fuel was
shut off. I turn the fuel on and hear the pitch of the fuel pump
change, so I fire up the engine and taxi out for run up. I taxied
up and down the runway a few times feeling out the plane, then returned
to the hangar. As I shut down in front of the hangar, I noted the
fuel level float is now most of the way down. Hmm. That's
odd since I started with the tank full. Nothing is leaking under
the plane, but I noticed a fuel stain where I had started up. I
flip on the master and boost pump, then note a gush of fuel running out
of the bottom of the cowling. Uh oh! This isn't good!
Turns out I had left the fuel drain valve on the gascolator
locked open from when I had drained the fuel 6 weeks ago. I
pumped 11 gallons of avgas out on the ramp and the runway. An
expensive taxi test as well as quite a fire hazard.

I also noted the Airspeed indicator appears to read quite high.
In calm air, the GPS was showing 22 mph across the ground while
the ASI was showing 45 mph. That's quite a descrepency. I
also noted the ASI is showing about 20 mph just sitting in the hangar.
So, a new ASI is now on order. But I was also suspicious
that perhaps the static line for the instruments was vented inside the
cockpit. That works OK in a closed cockpit. In an open
cockpit, it produces some very optimistic readings from the flight
instruments.

Sure enough, I found this plastic jar with holes drilled in it mounted
behind the front instrument panel where it will be sure to have a lower
than static air pressure. That plastic line routed in through the
lid was the termination of the static system. That all went in
the trash.

I routed a 1/4" nylon tube from the last instrument in the front
cockpit to the back of the rear cockpit and put a T in the tube with
each half of the T terminating in a "pop" rivet with the center of the
rivet drilled. (see black arrow in photo). If I'm not happy
with that, I'll install standard static ports.

May, 11, 2022 - My cousin Joni is in town. Joni has made seats
and done upholstery on a couple of planes for me and is quite talented
with a needle and thread or in command of one of her many sewing
machines. In this photo we are laying out a pattern for a cockpit
cover to be made from the remnants of my old motorhome cover. The
cover is shredded enough that it's junk, but still has a lot of good
fabric. Joni will fabricate the cover and I'll install the snaps
to attach it to the plane.

May 13, 2022 - I bought this larger Matco 11D tailwheel for the Cub and
will move the Scott 3200 Tailwheel over to the Charger to replace the
Aviation Products tailwheel. 11" diameter on a 5" wheel and a 4"
wide slick face on the tire. Hopefully the Scott 3200 will square
away the
tailwheel steering that feels just a bit funky on this plane.

New 11" fat tire Matco Tailwheel on the Cub. It took me three
tries to get the tailwheel steering to an acceptable configuration on
the Cub The configuration in the picture is too tight and the TW
wouldn't release. I added a link to each chain to loosen it up a
bit. I need to adjust on the TW itself a bit to loosen up the
steering some as it is very stiff. I will say that with it that
stiff, any tendency to shimmy will be damped out.

Scott 3200 now installed on the Charger. This is the second
configuration. I had compression springs on it instead of
extension springs. They were too tight and would not allow the TW
to release. I changed it to extension springs. I haven't
taxied it yet. We'll see how it handles when I get a chance to
get it out to play. The Scott 3200 just looks right on there.
I love the Aviation Products Tailwheels, but it just didn't look
right for the plane and I wasn't happy with the handling of the plane,
although I don't think that was the fault of the tailwheel itself.

May 14, 2022 - While the Scott 3200 tailwheel certainly looked right,
the geometry obviously isn't quite right. As soon as I got up any
speed at all, it immediately started to shimmy. I switched back
to the Aviation Products Tailwheel with the new steering spring
configuration I installed for the Scott TW, and now the plane feels
just the same as my RV-6 on the ground minus the shaking mains the RVs
are known for. It taxi's nicely now and handles well on the
runway, so the only thing left to do was fly. So, today was the
first flight. Stall is at 60 mph IAS with plenty of warning.
As soon as the flow starts to separate outboard, the outboard
landing wires start to rattle from the burble coming from the separated
flow. The engine runs strong and feels good, but is impossible to
hear over top of the wind noise. It appears to cruise around 125
mph IAS with a fuel burn of 8.8 gph, but I suspect a significant
discrepency between the GPS and the indicated airspeed. I need to
figure out how to get some bifocaled glasses under the visor on my
helmet as my near vision isn't good enough for me to be able to read
the numbers on the GPS. I flew the plane up to the EAA meeting in
Willow Springs, MO as well and ended up leaving there in the rain to
scoot back home between thundershowers.

April 9, 2022 - My cousin picked up three helmets for me at an auction
today. (Thanks Bob!) This auction was the belongings of a very
dear friend that
passed away last year at 98 years old. He took me on my first
airplane ride at age 16, 50 years ago now and was using these helmets
in his biplane (D'aPuzzo PJ-260). I also borrowed one of these
helmets when I picked up my Starduster in 1979. So, not only are
these helmets useful for me to use in my plane (as now I'll have a
selection of helmets to choose from for passengers), but also hold a
lot of sentimental value as well. Now that I have these helmets,
I can see they are in really rough shape. The parts are available
to refurb them to better than new status. But that's a project
for next winter. And it is not an inexpensive proposition.
The first two are Vietnam era Gentex APH-6B helmets commonly used
by the Air Force B-52 pilots. The third helmet appears to be a
Navy Gentex SPH-3, also Vietnam era. It is in much better
condition, but will still need a lot of TLC to get it into usable
condition. All three of these helmets have the dual visor option,
which is highly desirable. In the mean time, I also bought two of
the helmets below.

This is a Bonehead PilotX helmet. I bought two of them in sizes
XL and XXL. The visor has a protective pad velcroed over it.
The box behind the left ear has two purposes. The tiny knob
on the front is a volume control rheostat for the helmet. And the
gold plug you can just barely see on the box is the plug for the CEP
audio ear plugs. These helmets are light weight at 2# and
very comfortable. I am finding radio and intercom communications
in the open cockpit to be better with these helmets than any I have
ever experience before. They also have superior hearing
protection. Acceptable noise levels without the CEP ear plugs and
superior noise protection with the CEP plugs. I've added some reflective tape trim onto the Bonehead helmets since.

This configuratoin was a bit of a problem for me. My near vision
just isn't good enough to be able to read the numbers on the GPS or
avionics. I came up with a pair of safetyglasses with bifocals I
could wear under the dark visor. I bought a clear visor I could
also use, and wear my bifocaled sunglasses. That's the beauty of
the old military helmets above. They have dual visors, so I can
slide down either clear or dark visor for the right situation. I
shoujld be able to restore those old military helmets to better than
new condition and integrate a CEP hearing protection sytem into them
when I refurb them. (CEP = Communications Ear Plugs)
The bonehead helmets are quite light at 2# each. I ordered mine
with cloth covered gel ear seals on the ear cups with speakers, so can
be used like that. The helmets also have CEP hearing protection.
That is a set of speakers inside replaceable ear plugs that go
into your ears. You put them on first, then put the helmet on.
Once your helmet is one, you reach back and plug the CEP speakers
into the box on the back of the helmet. This makes for pretty
good communications betweent he cockpits and also makes it so I can
actually hear and speak on the radio. Anyone that flies open
cockpit plane will tell you communications is a real challenge.
Additionally, a squelched intercom won't work in the high noise
environment of an open cockpit plane. Instead, the intercom that
is integral to the radio has a pin that toggles the intercom on to
enable the intercome when grounded. So, the front cockpit has a
PTT (Push to Talk) switch on top of the stick that enables the intercom
so the passenger can talk to me. I have a two way PTT toggle on
the rear stick that allows me to push one direction to toggle the
intercom on so I can talk to the passenger, and the other way to
transmit on the radio. Most radios with an integral intercom have
this as an option and it works great. I may enable that option on
the Xcom radio in the Cub to improve communications when I'm flying
with the doors open (normal for me during the summer months).
Now that I've got a little time in the plane, I was able to rewrite a Pilots Operating Handbook to fit the plane.
N145BB POH.pdf
June 12, 2022 - Becky and I were at a weekend airport camp out with the
EAA Chapter in Willow Springs, MO this weekend. I flew a number
of rides in the SuperCub on Friday and the Charger on Saturday. I
have a couple of short videos that were taken. I pulled them from
Facebook, so the quality is pretty poor. If I can get the
originals, I'll post them up in place.
Take off video Better resolution video on FB
Flyby video Better resolution video on FB
Promo video for EAA Chapter 1218 taken Sunday morning before departing for home.